Tag: fun-n-crafty

Fun-n-Crafty | Tropical Escape

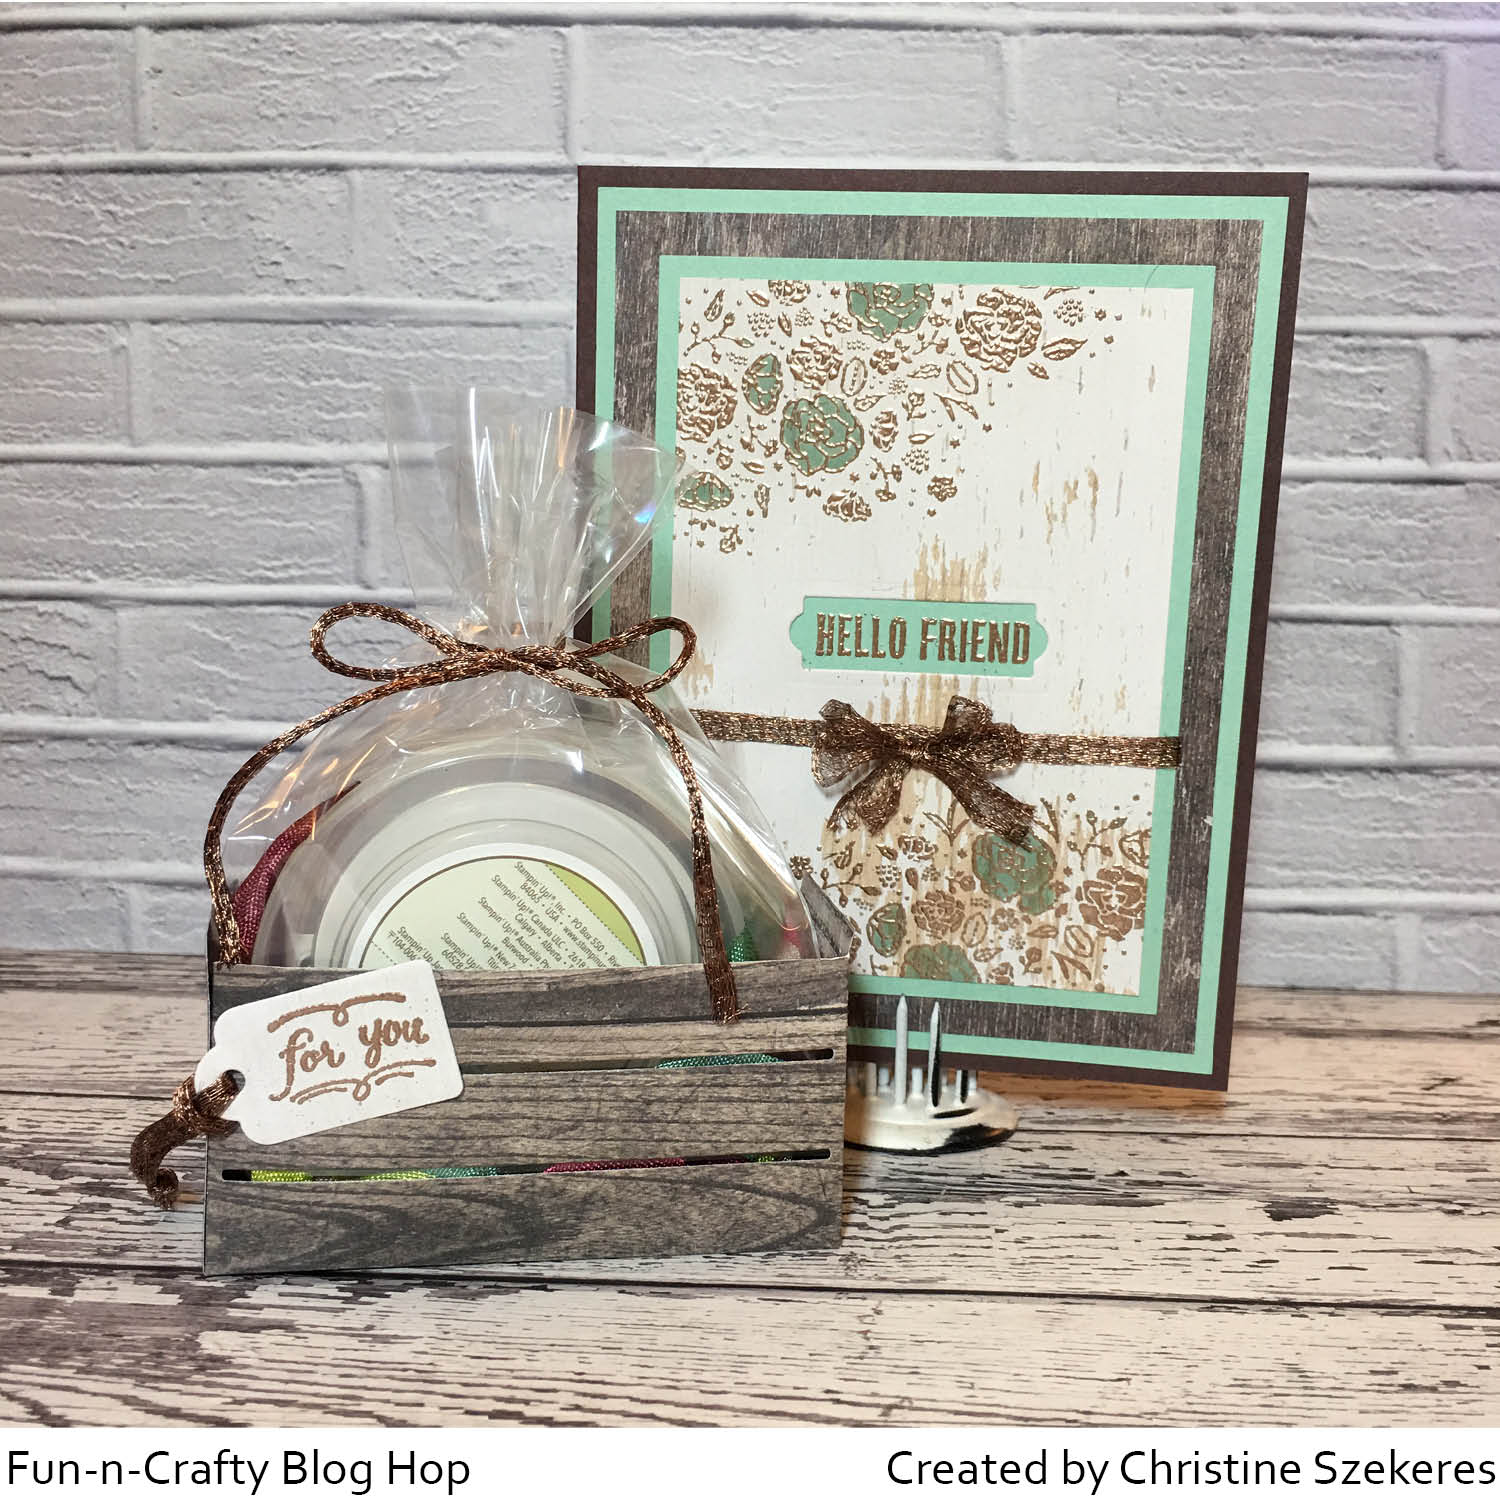
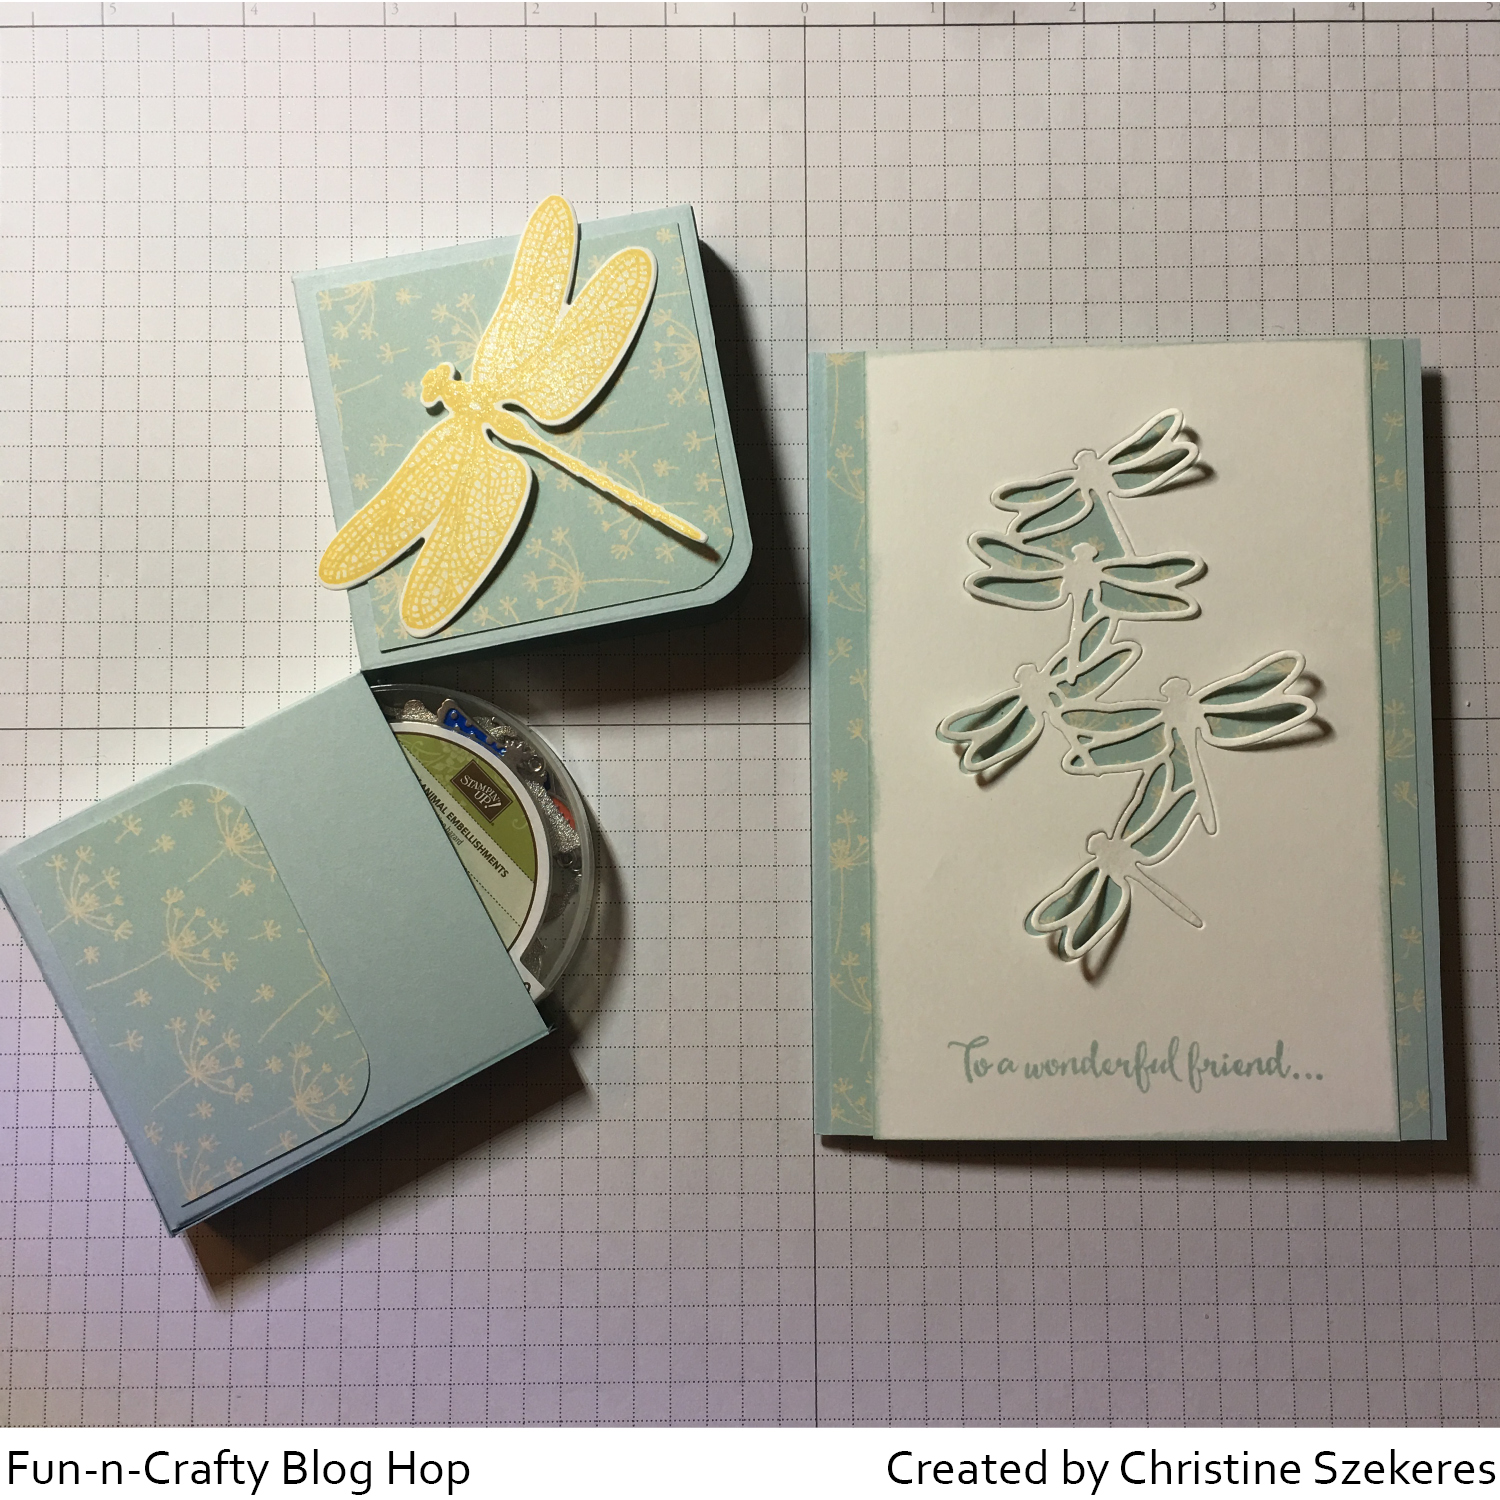
Hello my crafty peeps! I’m happy to be here again this month as part of the Fun & Crafty blog hop. You should have arrived here from Jennifer Blomquist’s NW Stamper blog. If you didn’t, not to worry the complete list is below! This month’s theme is new catalog goodies! June and July are always full of excitement and renewed creativity, in part, due to the release of the new annual catalog from Stampin’ Up! This month a few of us participated in a new catalog card swap to get even more creative ideas to share with you!

For my creation I decided to use the new Tropical Escape suite, which includes the Tropical Chic stamps, Tropical Thinlits dies, Tropical Escape DSP, and the cutest Tropical Elements (little hibiscus flowers and leaves). This is currently my favorite set in the entire catalog. To see my top 10 goodies, visit this post. In the coming months I plan to use more of my favorites in projects and blog posts so stay tuned!


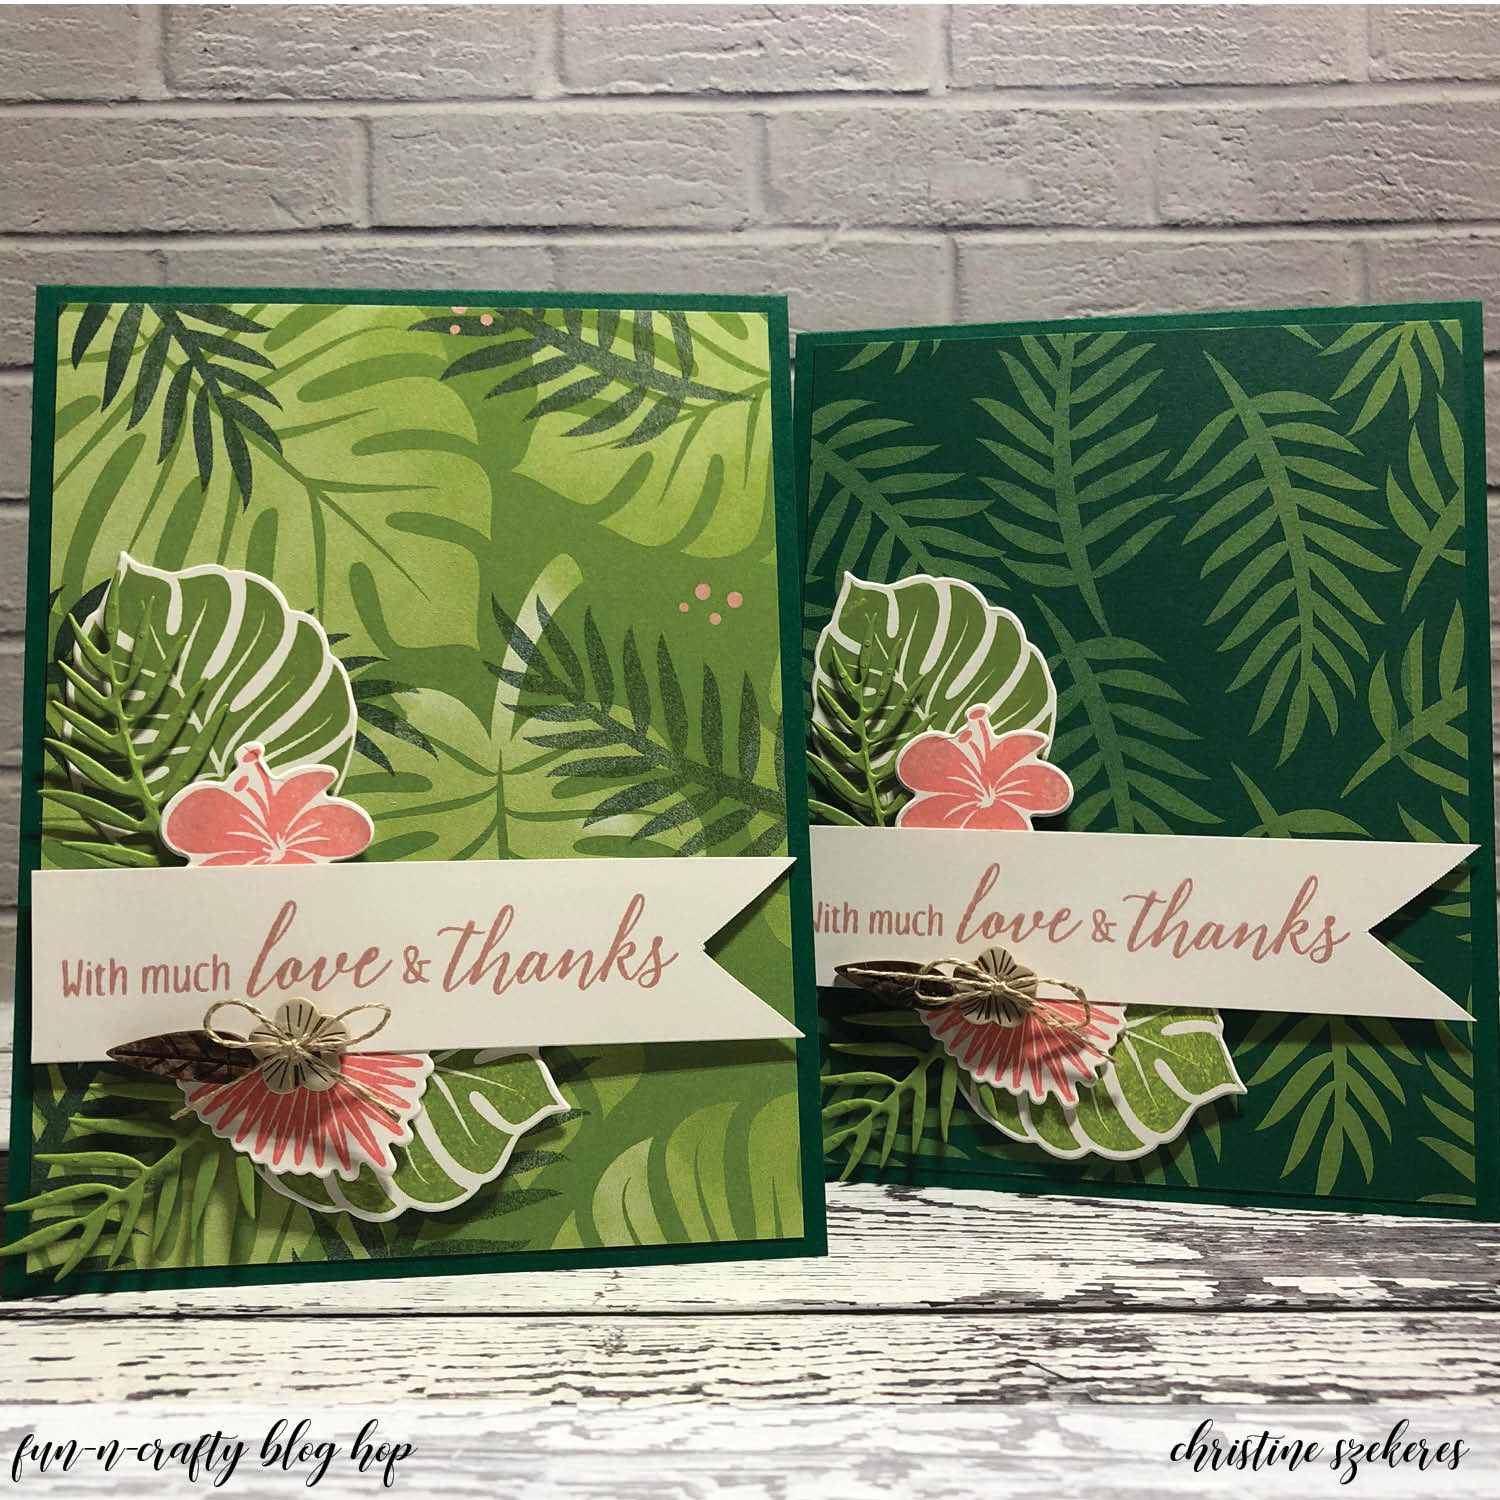
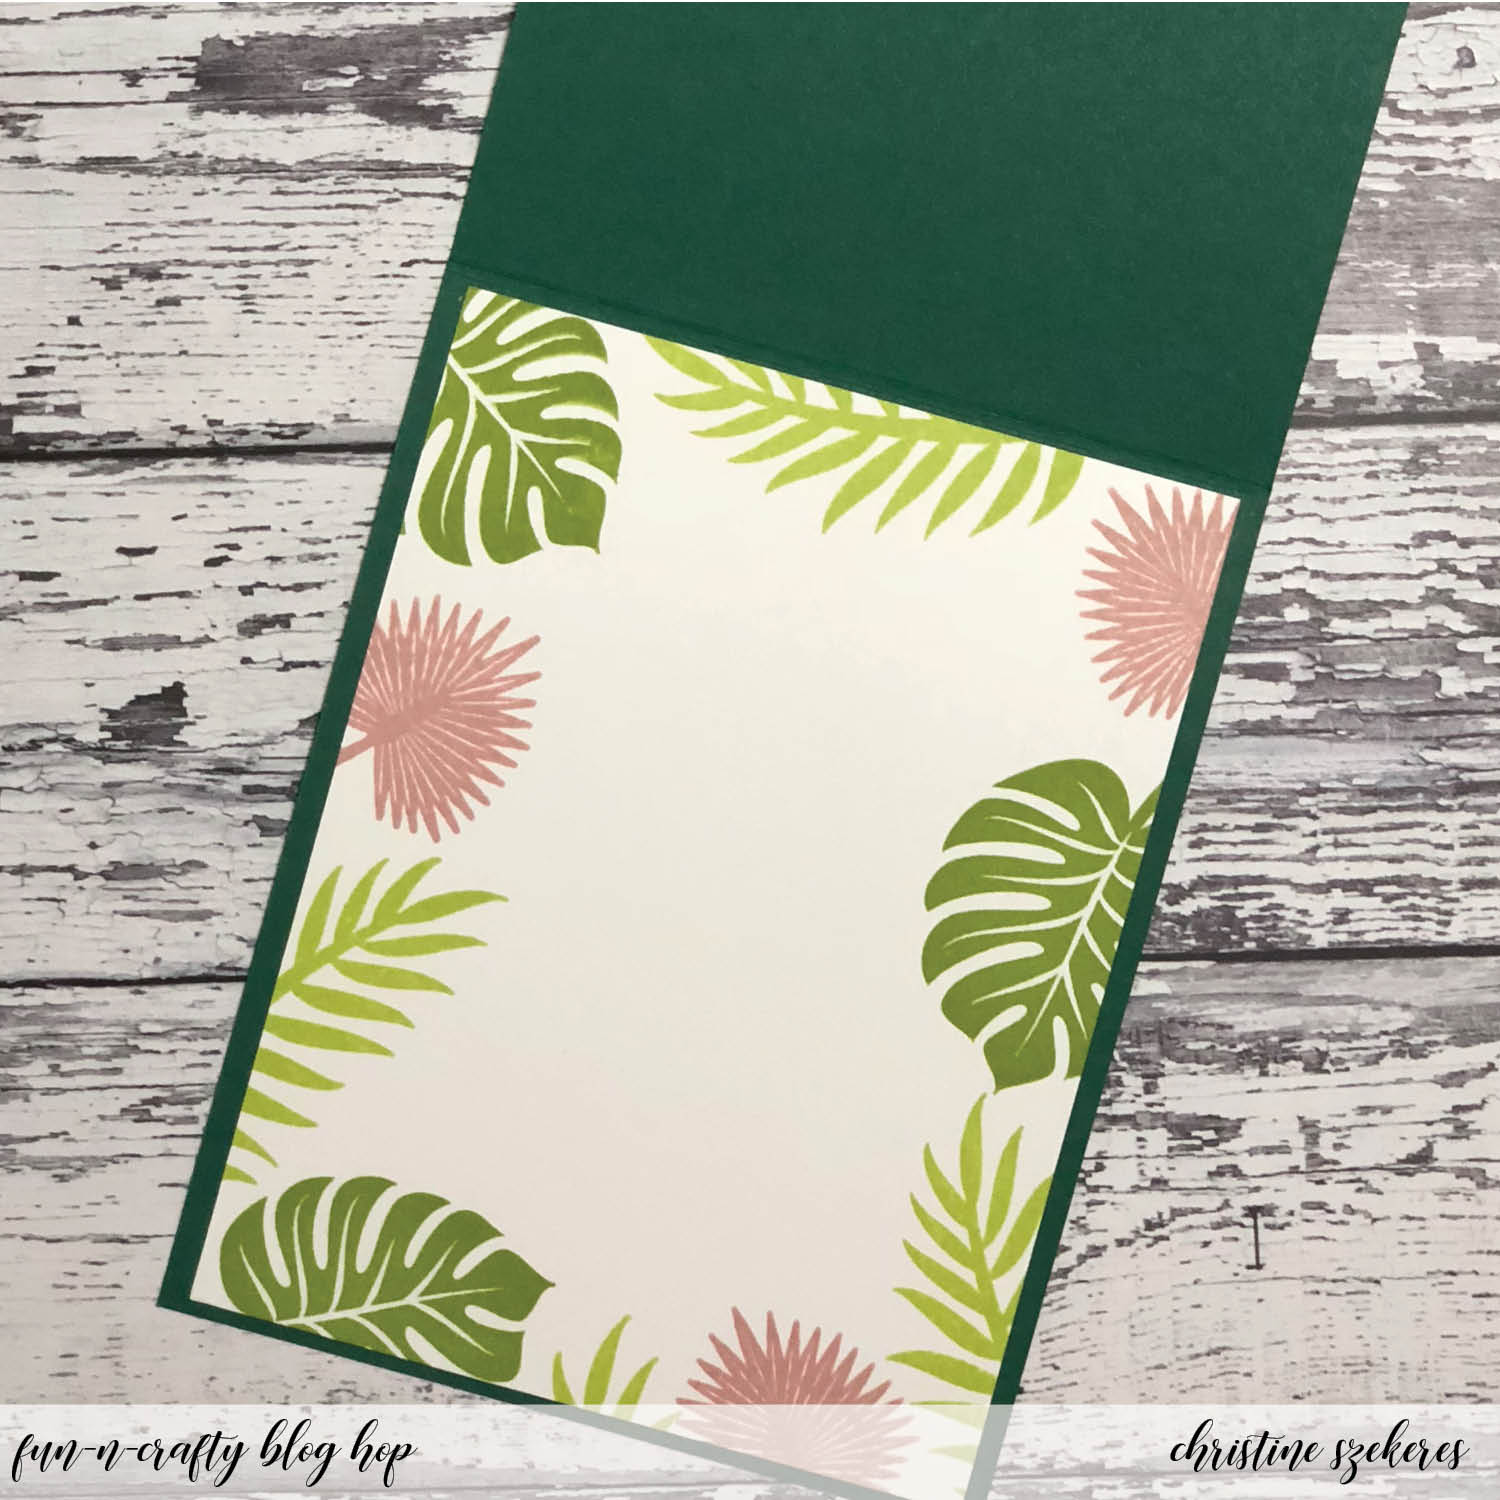
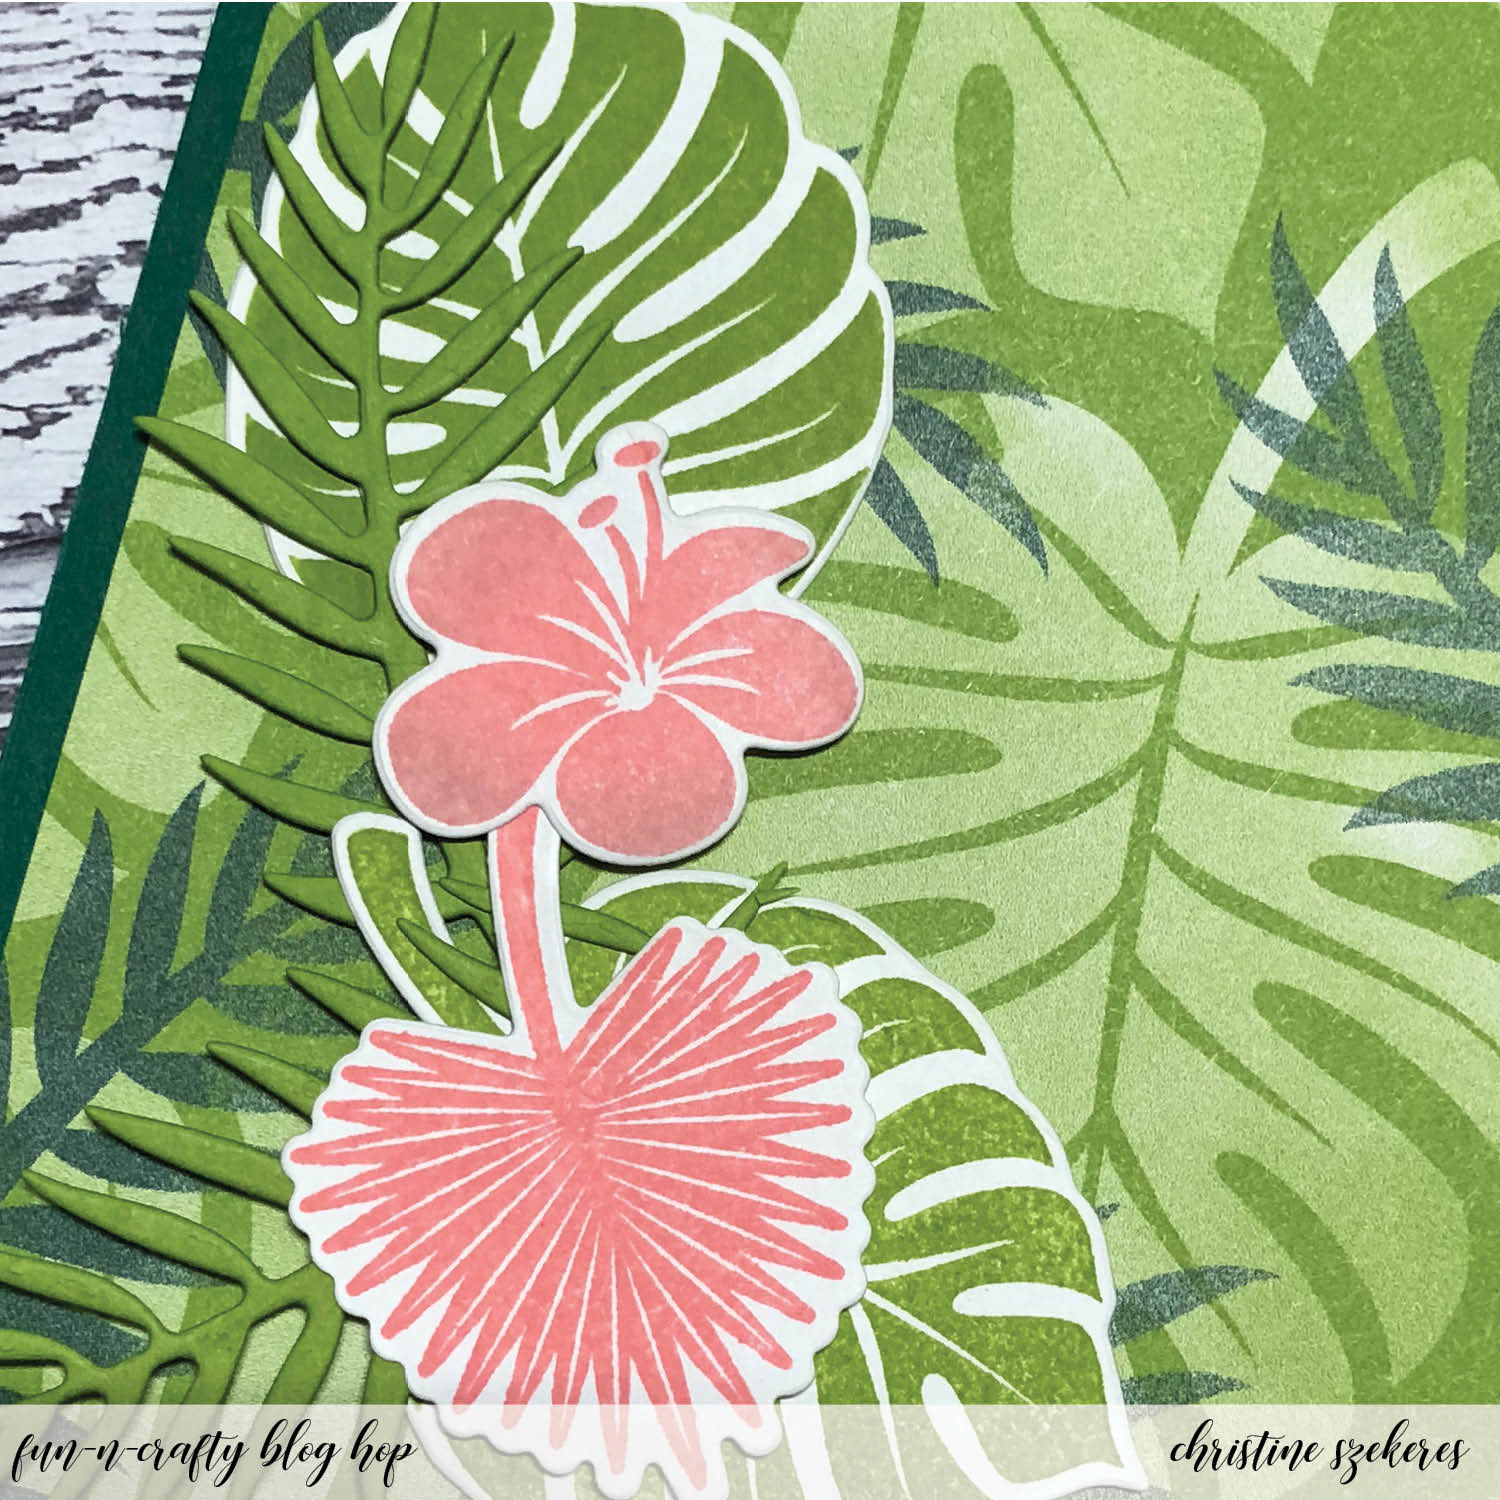
I started with a Shaded Spruce top-folding A2 card base and because it’s a dark color I decided to include a white insert for writing a message to that special someone, which meant more stamping inside! I began by cutting a piece of the Tropical Escape DSP to 4″ x 5.25″ for the front. Next, I stamped the hibiscus flower and the small and medium leaves on Whisper White card stock. I inked up the flower with Flirty Flamingo, and using a sponge dauber I added a little hint of Blushing Bride to the petal tips. I stamped the small leaf in Flirty Flamingo and the medium leaf in Granny Apple Green. Is anyone else loving the new ink pad design, ink formula, and the 16 new/returning colors as much as I am?!?


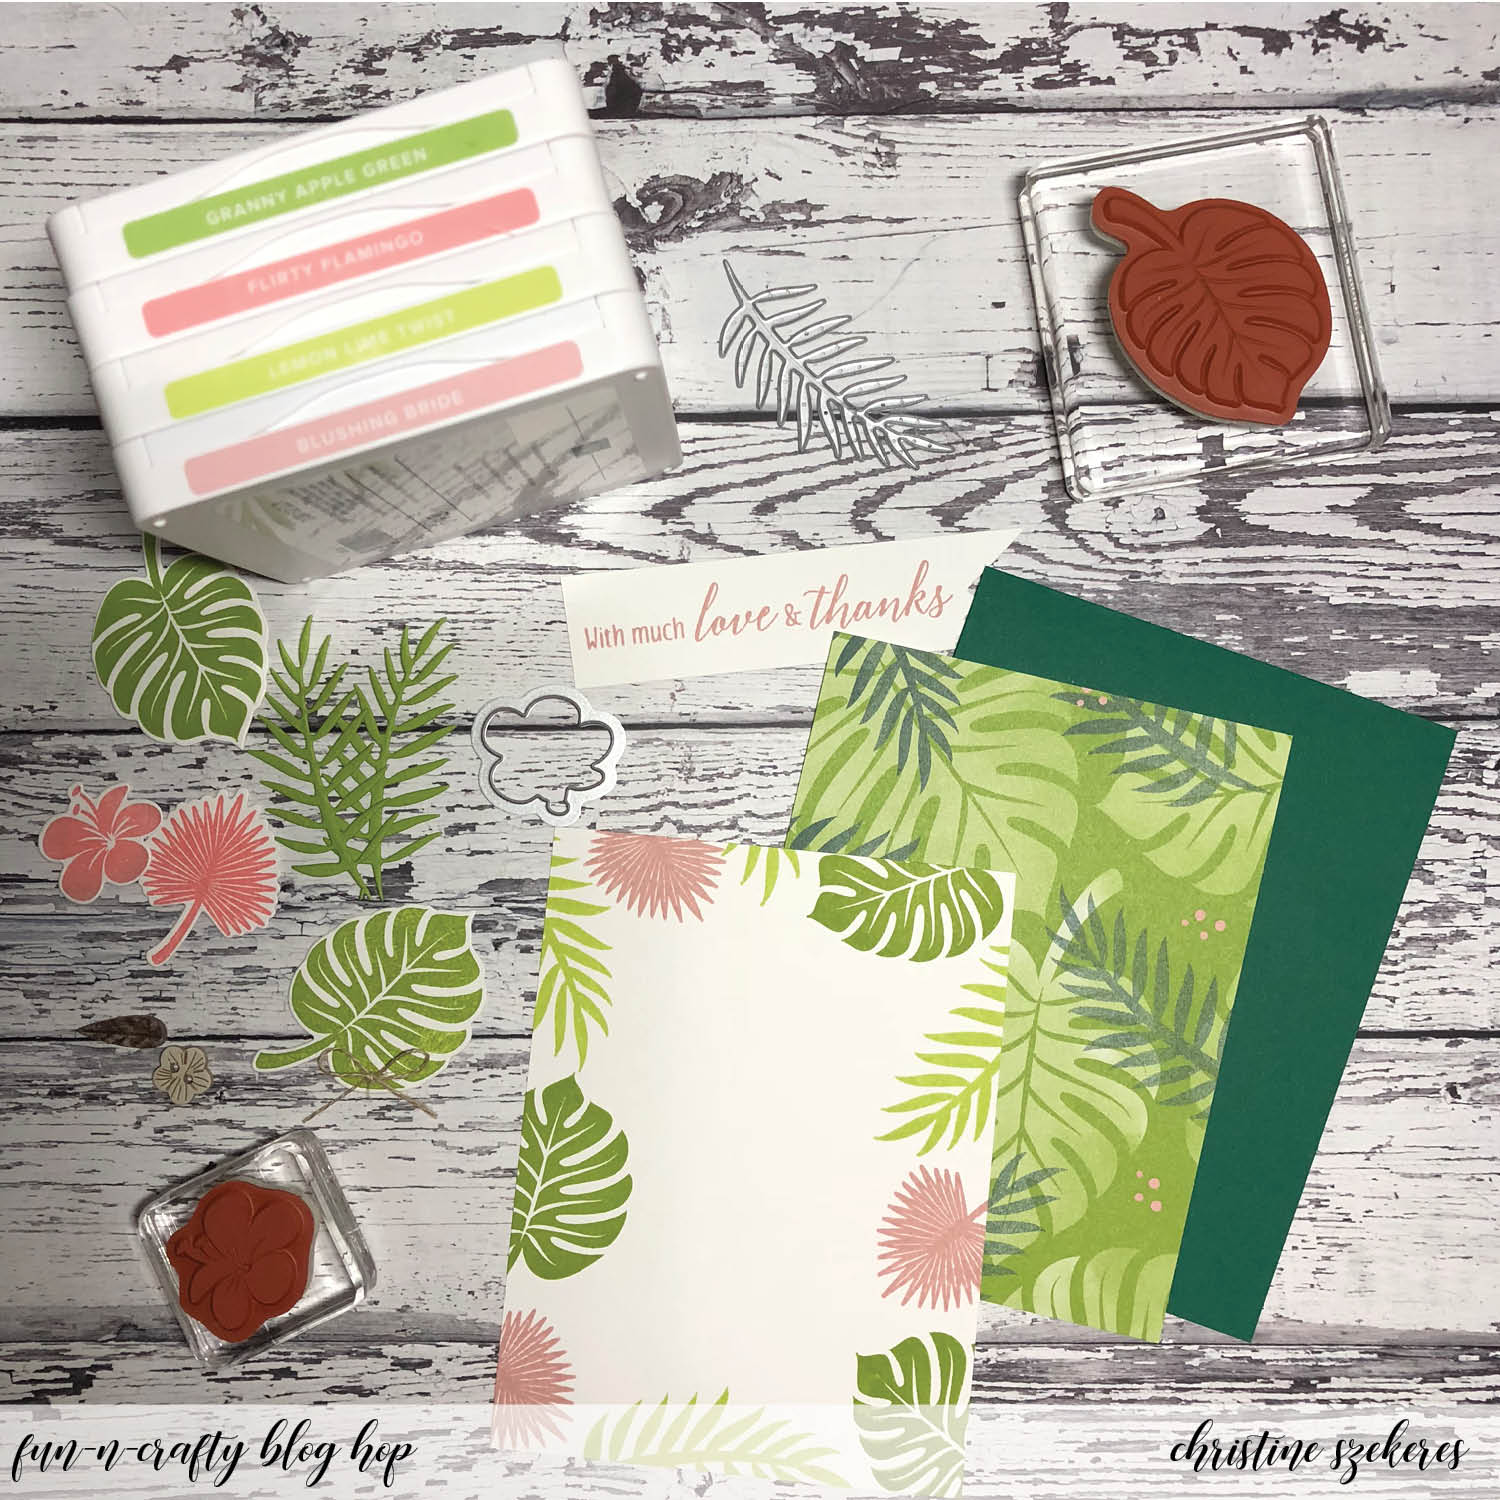
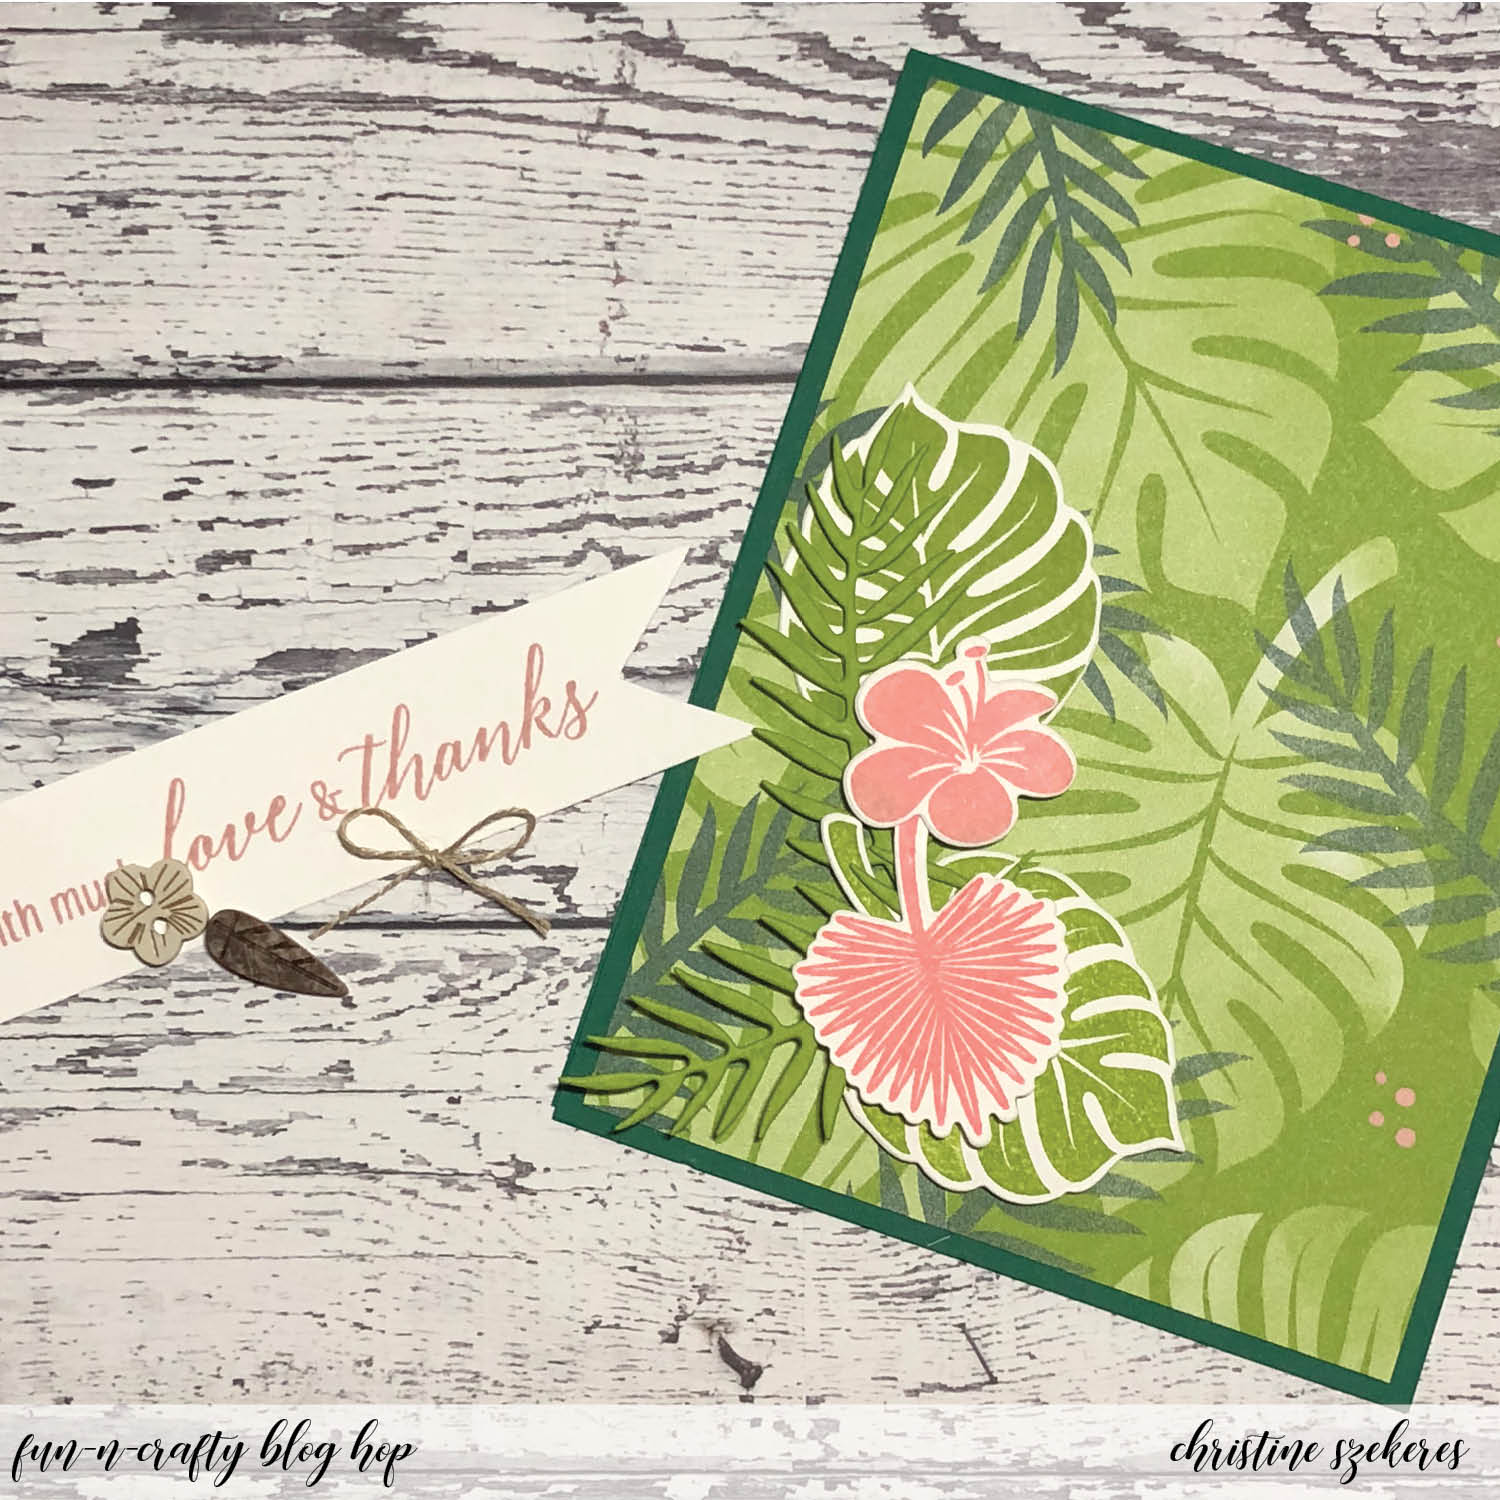
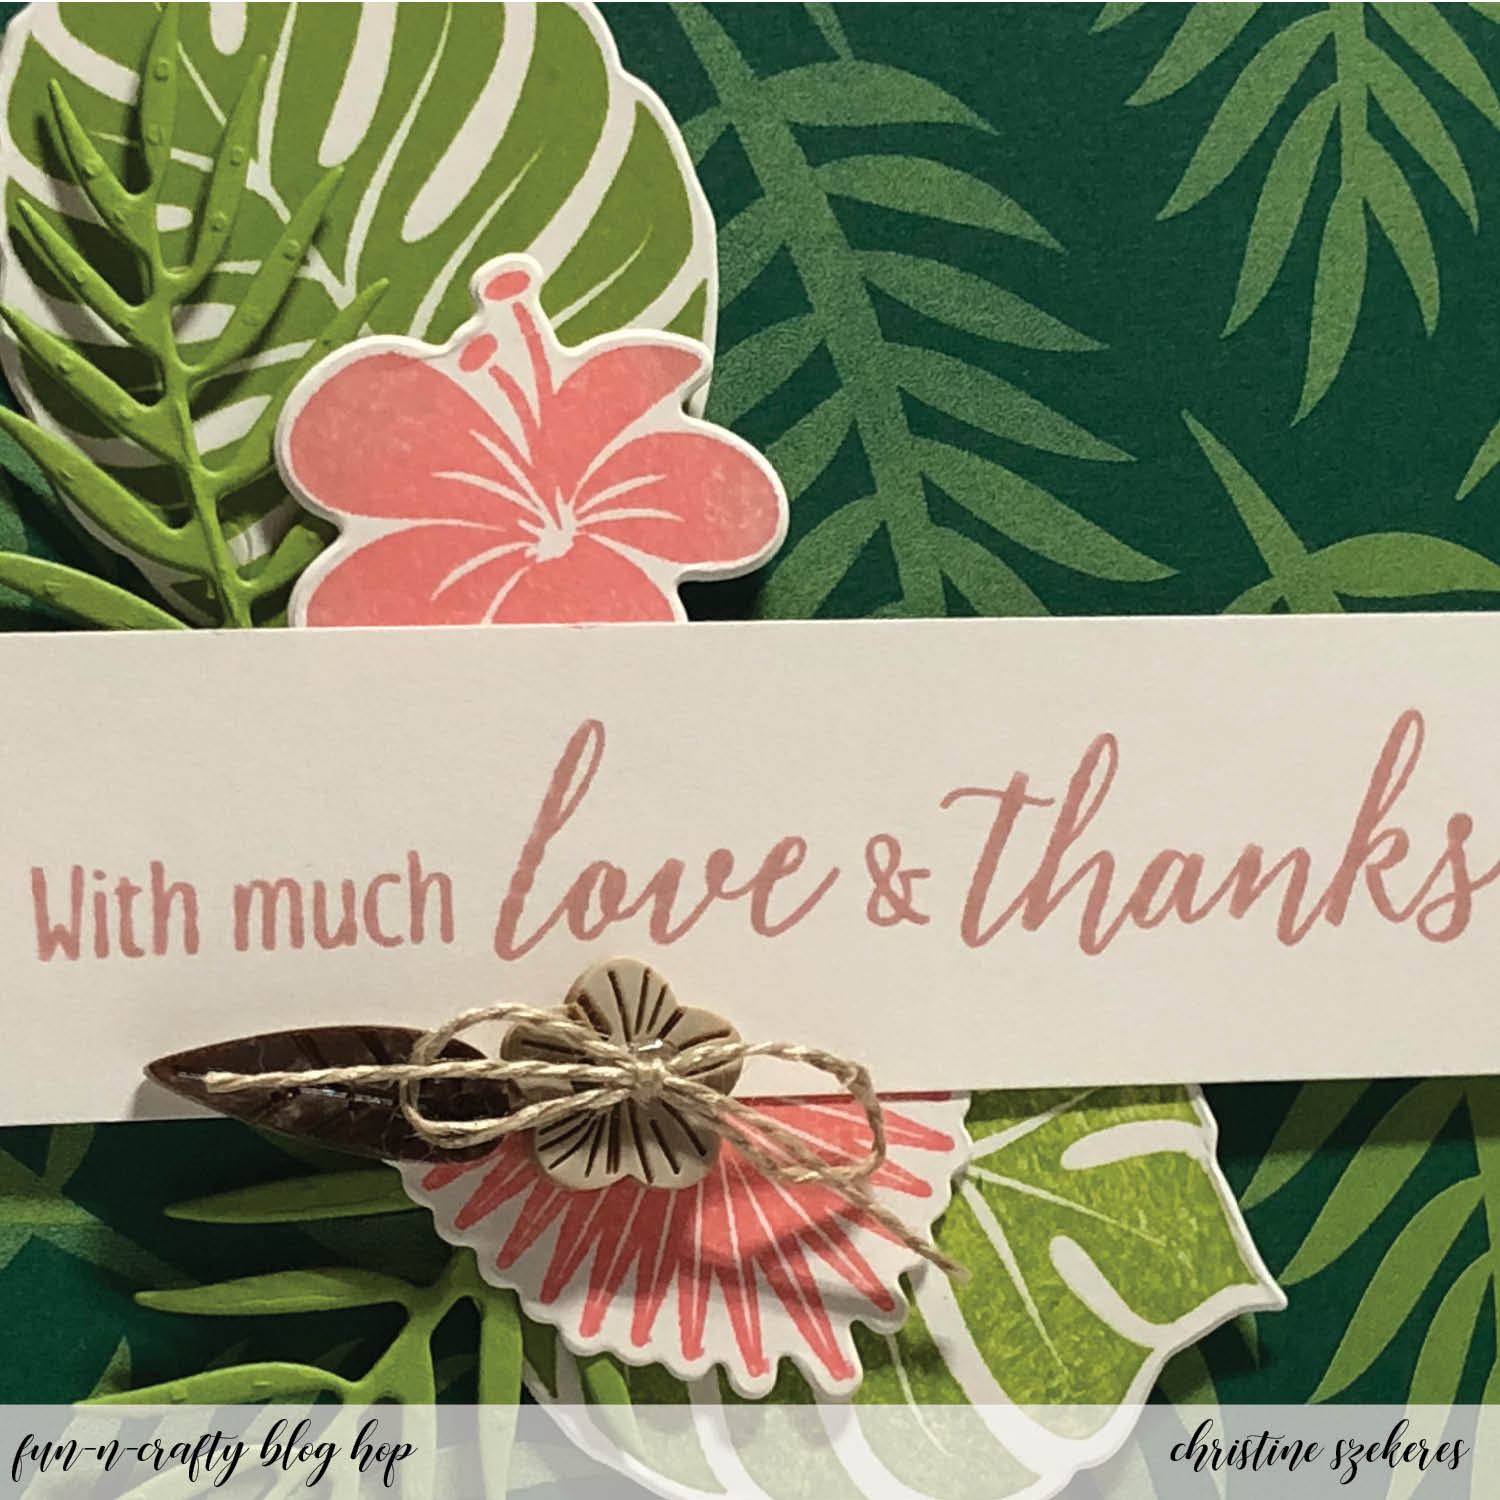
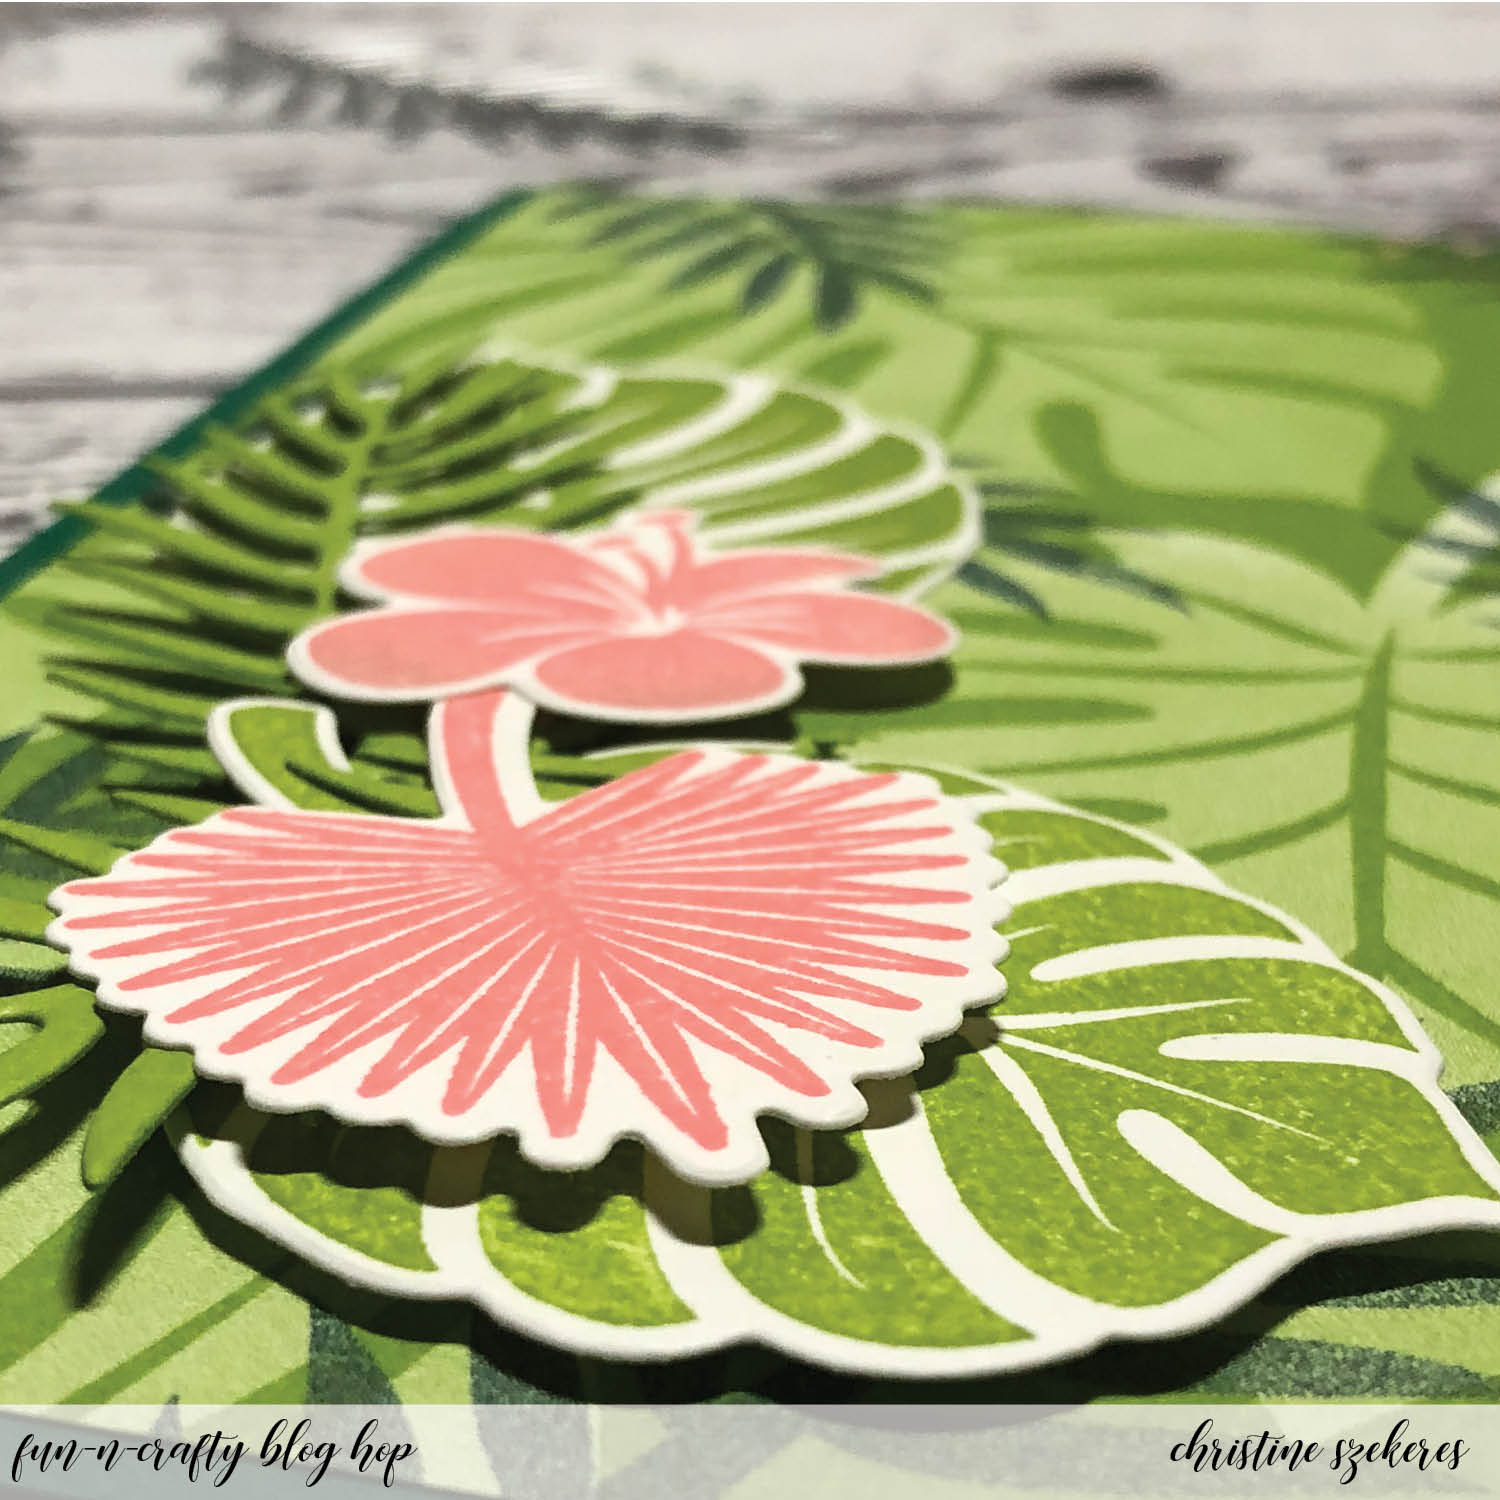
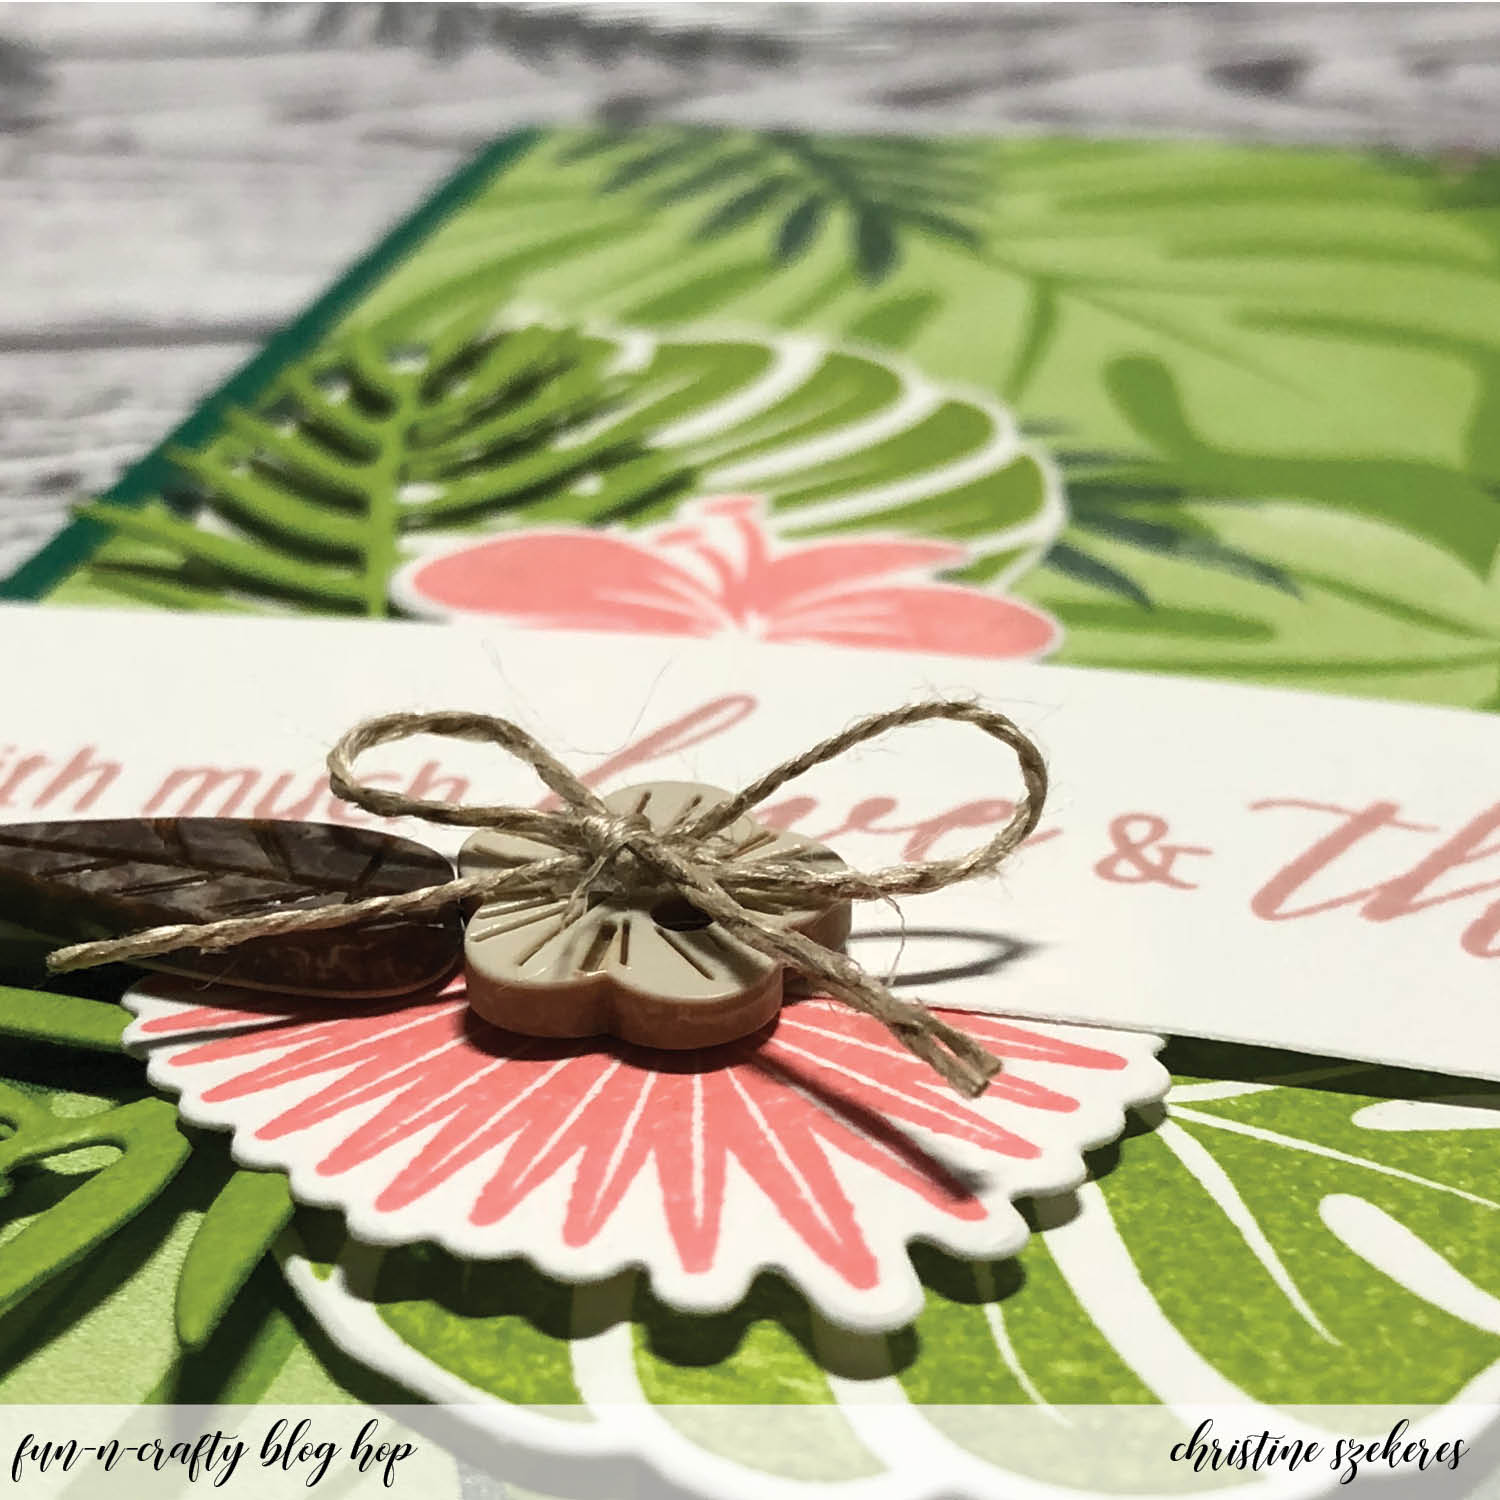
Then it was time to die cut the flowers and leaves. These dies are so versatile, each of the leaves has two dies, one cuts the outline and another cuts the interior, so you could cut leaves out of two different colors of card stock, or a combo of cars stock and DSP, or two different DSP patterns — like I said, versatile! I also cut two interior long, large leaf fronds out of Granny Apple Green card stock. Each card used one hibiscus, one small leaf, two medium leaves, and two large leaf interior die cuts. While I had the stamps and ink out I also stamped the sentiment, “With much love & thanks” in Blushing Bride on a strip of Whisper White card stock and stamped the leaf border on the inside panel using all three leaves (small in Blushing Bride, medium in Granny Apple Green, and large in Lemon Lime Twist). I adhered this panel to the inside of the card.


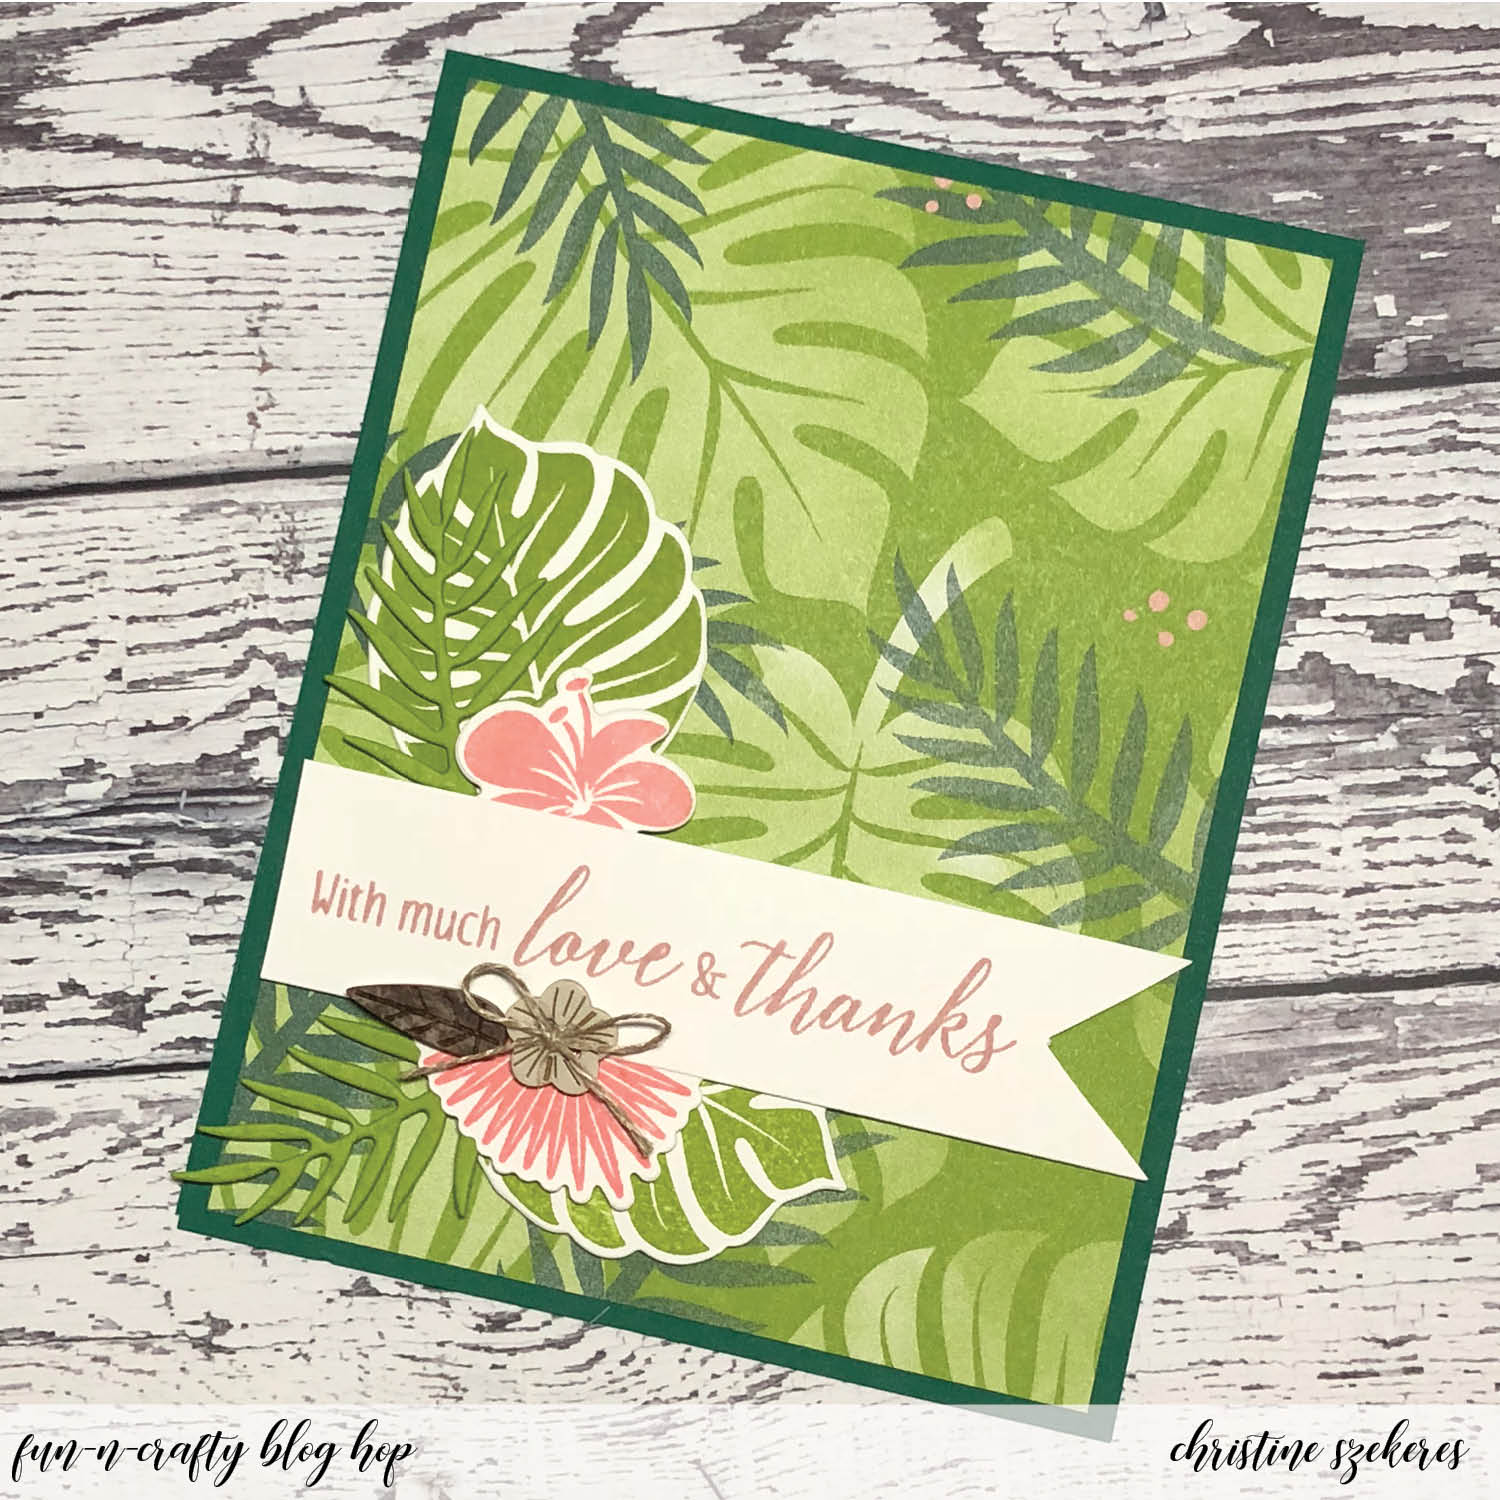
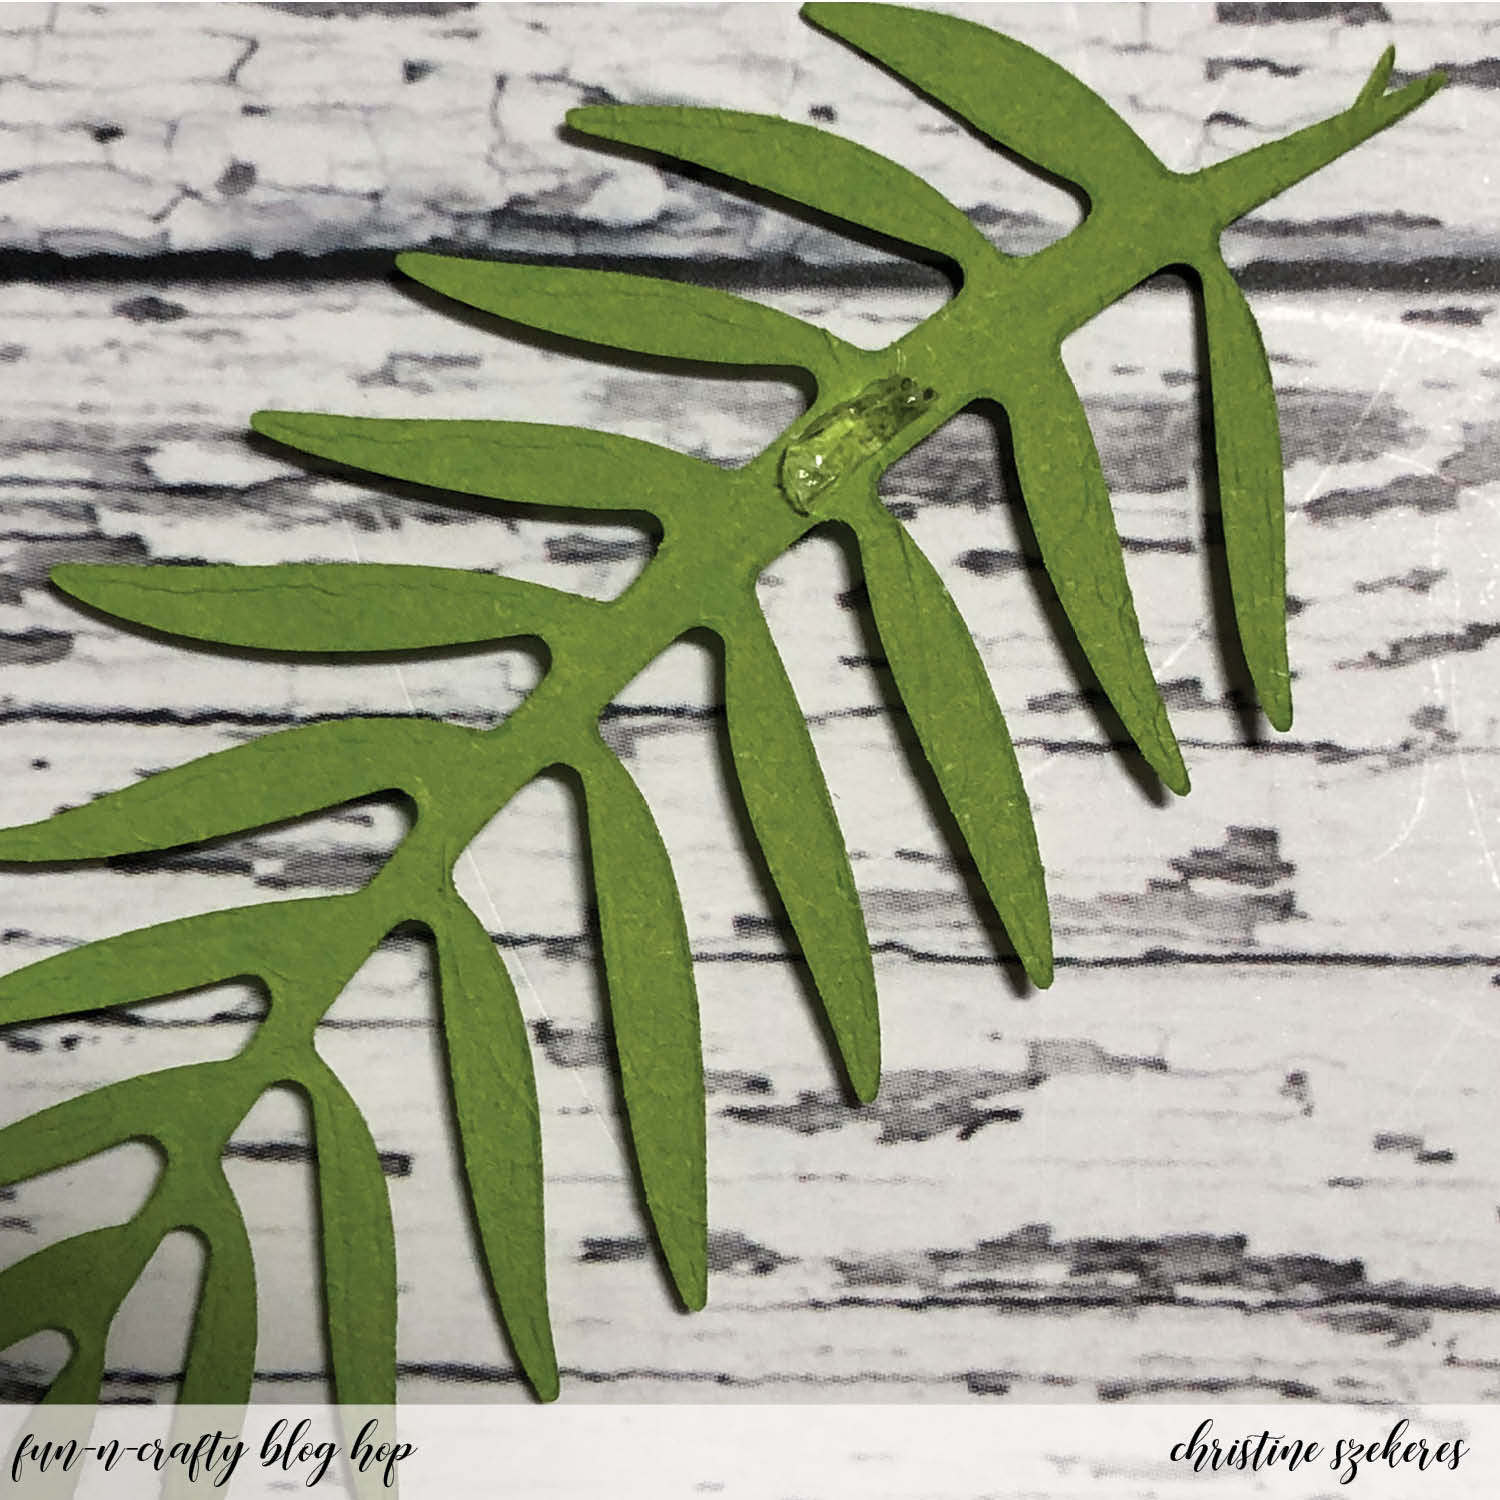
All that remained, was assembling the cards. I knew I wanted varying levels of dimension on the card front, which I achieved using a combination of adhesive, mini glue dots, and dimensionals. The upper medium leaf went down flat with Snail and the lower medium leaf I popped up using dimensionals. Next, using mini glue dots, I positioned the two large interior leaf die cuts. HINT: Adhering thin cuts can be challenging, one of my favorite tricks is rolling the mini glue dots. Using my craft pick I roll up the glue dots so they fit neatly behind even the thinnest things (see below). Next, I adhered the small leaf on top of the lower medium leaf using Snail and the hibiscus flower I popped up using dimensionals. Using one dimensional on each end, I positioned the sentiment over the leaf and flower cluster. For the final touch I used a rolled up mini glue dot to adhere a small linen thread bow to the flower and then attached the flower and leaf to the card, also using mini glue dots.


There is a ton of inspiration throughout this hop and I encourage you to grab your Stampin’ Up catalog and some post-it notes, and visit the other talented crafters listed below to see what they created and perhaps leave them some crafty love! Up next is the wonderful Tobe. Until next time, remember, creativity and imperfection live together in all we do. “Grace is the face love wears when it meets imperfection.”

~xoxo


  1. Nicole — Inky Fingers Stamping
  2. Jennifer — NW Stamper
  3. Christine — Artful Musings (you are here)
  4. Tobe — The Craft Sea

Supplies Used:
Tropical Chic Bundle (148399)
Tropical Escape DSP (146916)
Card Stock: Whisper White, Shaded Spruce, & Granny Apple Green
Ink: Granny Apple Green, Flirty Flamingo, Lemon Lime Twist, & Blushing Bride
Accessories: Tropical Elements (146919), Linen Thread, Dimensionals, Snail, & Glue Dots 

Fun-n-Crafty | Let’s “Lemon Lime” Twist Again

Hello my crafty peeps! I’m happy to be here again this month as part of the Fun & Crafty blog hop. This month we are highlighting the new 2017-19 In Colors from Stampin’ Up. I am always amazed at how well the new colors weave into the existing palette as well as coordinating with one another. These new In Colors are no exception. I decided to focus on my favorite of the five new, Lemon Lime Twist. This color is a light and vibrant green that works well with many other colors including these: Pool Party, Island Indigo, and Melon Mambo. To see the full range of In Color combinations for all the new In Colors, please click here. Today I am presenting two original cards. 

For the first card I began with a Whisper White A2 card base. Next, I ran the Split Chevron cover plate from My Favorite Things through my Big Shot three times: once in Lemon Lime Twist card stock and two times out of Lemon Lime Twist Fresh Florals DSP. I love inlaid die cutting and decided to fill up the Chevron pieces using these three colors and letting the Whisper White show through in some spots. For the finishing touch I wanted to add a die cut sentiment in Pacific Point card stock but realized I didn’t have any on hand. Fortunately, I have the ink pad and using a dauber, I was able to turn Whisper White card stock into Pacific Point card stock. Because the background is inlaid (essentially one layer) I decided to add some dimension for the sentiment so I die cut it three times (twice in white). I glued these together with the inked one on top and, ‘Voila!’, dimension.


For the second card I began with an A2 Whisper White card base. I added a Lemon Lime Twist mat (4″ x 5.25″) and then cut Fresh Florals DSP strips in various sizes. I glued the DSP strips down to the mat leaving a place for the sentiment. Using my MISTI I was able to stamp the whole sentiment at once, making sure it was well positioned within the allotted space. There are several great hostess sets, and Dare to Dream is one at the top of my list.


BONUS: over the past month and a half we (the Fun-N-Crafty team) have been playing with the new SU products. Below are two cards I made at recent events, one from a shoe box swap with my SU team (card by Kathy) and the other from a catalog party I helped a fellow team member with (card by Nicole). Both cards feature Lemon Lime Twist along with Berry Burst.


There is a ton of inspiration throughout this hop. Since you started here, I encourage you to grab a cup of tea and visit the other talented team members listed below to leave them some blog love! Next up is the talented Pamela over at Stinky Tofu. Until next time, remember, creativity and imperfection live together in all we do. “Grace is the face love wears when it meets imperfection.”

~xoxo


  1. Christine – Artful Musings (you are here)
  2. Pamela – Stinky Tofu
  3. Kathy – Stampablog
  4. Merit – MB Squared Designs
  5. Susan – Stampin’ By the SF Bay
  6. Jennifer – NW Stamper

Supplies Used:
Card Stock: Whisper White, Lemon Lime Twist, Berry Burst, Chocolate Chip, & Kraft
Ink: Lemon Lime Twist (144086), Berry Burst (144083), & Pacific Point (126951)
Stamps: Thankful Thoughts (141522), Dare to Dream (143769), & Colorful Seasons (143726)
Dies: Seasonal Layers (143751) & Sunshine Wishes (141489)
Punches: Banner Punch (138292) & Pretty Label Punch (143715)
Paper: Fresh Florals DSP (144131), Vellum (101856), & Metallic Doilies (138392)
Embellishments: Bitty Bows (144217) & Silver Thread (138402)
Extras: Paper Trimmer, Score Board, Adhesive, Big Shot, Sponges/Daubers & Scissors

Fun-n-Crafty | New Catalog Preview


Hello my crafty peeps! I’m happy to be here again this month as part of the Fun & Crafty blog hop. This month’s theme is new catalog preview, that magical time of year when there is a 236-page treasure trove of new (and carrying over) goodies to crave.

What am I excited about? How long do you have? My catalog is a bit dogeared and contains oh so many tape flags of the must-have goodies. Some “must have” suites and stamps include: Coffee Break Suite (stamps, dies, papers, and accents all with a coffee theme), This Little Piggy (the cutest stamp set of pigs and sentiments), Birthday Memories Suite (so cute with it’s fun party images and dies that cut images out of the DSP – so creative), and Delightful Daisy Suite (combining the freshest colors and floral imagery, this set is sure to be a staple in the next year). Some “must have” tools and embellishments include: mini pop dots, Ombre ribbon, glitter enamel dots, faceted gems, embossing paste, copper trim, and crinkle seam binding. 

Here are some catalog details, painstakingly complied by my fellow hopper, Stacey over at A Work of Carte.

Catalog “By the Numbers” | Top Ten Edition

Stamp Sets: 192 (82 NEW)
New Ink Colors: 5
DSP: 15
Embellishments: 23 (18 NEW)
Ribbon STYLES: 23 (15 NEW)
Ribbon SPOOLS: 71 (56 NEW)
New Adhesive: 2
Punches: 32 (8 NEW)
Folders: 18 (7 NEW)
Dies: 57 (20 NEW)


For this month’s blog hop I’m focusing on the new Wood Words stamps (143925), Copper Trim (144179), and Wood Textures DSP (144177). These new items were some of the very first things I zeroed in on in the new catalog so when it was time for demonstrator pre-order I was thrilled they were on the list. There is also the Wood Crate die (143730) , which creates the cutest little 3-D crate and is perfect as a goodie basket to hold SU! embellies, candies, small cards, soaps, or even a gift card. These items will all be available on June 1st when the new catalog launches.

For my project today I’ve created a simple card and I’ve also cut out and built the crate. Interestingly enough, the wood crate is sized to fit perfectly in the 3″ x 6″ gusseted cellophane bags (141704).


For my card I used Mint Macaron cardstock (retiring on May 31st) and two different sheets of the Wood Textures DSP (a light and dark). I began with an A2 (4.5″ x 5.5″) card base in Chocolate Chip. To this I mounted a 4″ x 5.25″ mat in Mint Macaron and on top of that a 3.75″ x 5″ piece from the DSP. The top layer consists of a 3.25″ x 4.5″ mat in Mint Macaron and the topmost piece (where I did most of the stamping and embossing) of light DSP (3″ x 4.25″). First, using my mini MISTI I stamped the large floral image from the Wood Words stamp set twice (on the top and bottom) using Versa Mark ink and sprinkled on Copper embossing powder (141636), which I then heat set. Once it was cool I used my Mint Macaron Stampin’ Write marker to color in the open flowers to match the card stock mats. 


The last thing I decided on was the sentiment. I wanted to pull forward a bit more of the Mint Macaron so I die cut the smallest banner from the Bunch of Banners Framelits (141488) and then mounted the DSP panel to the Mint Macaron mat. Again, using my mini Misti, I stamped in Versa Mark and embossed in copper the sentiment “Hello Friend”, also from the Wood Words stamp set. For the final touch, I wrapped some of the new Copper Trim around this top panel sticking it to the back before I mounted the final panel to the card. HINT: To add a nice bow I usually tie it separately and then adhere it to the ribbon I laid down using a mini glue dot. This helps me have a pretty and even bow every time! Because this is a dark card base I also cut a Mint Macaron mat (4″ x 5.25″) for the inside so I could write a note!

I just love this stamp set with it’s farm fresh images and I can’t wait to play further with all the dies and stamps in this bundle. Remember, the new catalog launches on June 1st! There is much to enjoy throughout this hop, all of it from the new catalog that launches on June 2nd. Since you started here, I encourage you to grab a cup of coffee and visit the other talented team members listed below to leave them some blog love! Next up is the talented Merit at MB Squared Designs. Until next time, remember, creativity and imperfection live together in all we do. “Grace is the face love wears when it meets imperfection.”

~xoxo
Beanie


  1. Christine — Artful Musings (you are here)
  2. Merit — MB Squared Designs
  3. Pamela — Stinky Tofu
  4. Susan — Stampin’ By the SF Bay
  5. Stacey — A Work of Carte
  6. Jennifer — NW Stamper

Supplies Used:
Wood Words Stamps
Wooden Crate Framelits Dies
Wood Textures DSP
Card Stock: Chocolate Chip & Mint Macaron
Mint Macaron Stampin’ Write Marker
3″ x 6″ Gusseted Cellophane Bags
Copper Trim
Inks: Versa Mark
Copper Embossing Powder

Fun & Crafty | Sale-A-Bration Celebration

We are down to the final days of Sale-A-Bration and the Occasions catalog so to send this year’s event out with a bang I’m on the blog today with a sale-a-bration celebration. There is still time to grab a few freebies (each $50 you spend on Stampin’ Up! product earns you a free Sale-A-Bration item) before the promotion ends. As a bonus, just today a few last-minute items were added (see picture – thanks to my upline, Jennifer Blomquist over at NW Stamper, for the image).

For today’s project, I’d planned to use the 6 x 6 glimmer paper that was part of Sale-a-Bration, unfortunately it sold out on Sunday so I had to alter my project to focus on the Occasions catalog stamp set that we’ve learned is carrying over into the new 2017-18 catalog, which will launch in June. This set is probably my favorite of the catalog, Dragonfly Dreams (144728). For today’s hop, I created a card and a hinged box. The box I’ve seen on many blogs and in at least one origami book. Interestingly enough, it happens to perfectly hold one of the small embellishment containers from Stampin’ Up!


I used Soft Sky (131181) and So Saffron (126957) inks, Soft Sky paper (131203), the dandelion print paper from the Falling in Love DSP (142788), and the clear Wink of Stella shimmer pen (141897). Starting with a standard card base I cut a piece of the dandelion print from the DSP pack to 4″ x 5.5″. Next, I cut a panel for die cutting the dragonflies out of Whisper White card stock (100730) and sponged the edges with Soft Sky. Once I die cut the dragonflies I colored over them with the clear Wink of Stella pen to give them that dragonfly shimmer. I used a die cut inlay technique where you insert the die cut back into the overall panel to create the paper inlay. I also curled up some of the wings to give the card dimension and stamped one of the sentiments from the set onto the bottom using Soft Sky.

The box is an oldie but a goodie. A very simple hinged box that is built using a 7″ x 6.5″ piece of card stock and two smaller pieces of DSP (a 2.5″ x 2.5″ and a 1.5″ x 2.5″ piece). As I said, I’ve seen it around a lot, including an origami book about box creation. I did find a wonderful video by Crafty Caroline showing her building the box. Below are two images of the box before construction, the first showing the score and cut lines and the second showing the box cut and scored before putting it together. Score lines for the 7″ side: 1/2″, 3 1/4″, 3 3/4″, and 6.5″. Score lines for the 6.5″ side: 1/2″, 3 1/4″, and 6″.


There are still great Sale-A-Bration freebies to be had through March 31st! If you order the Dragonfly Dreams bundle now you can take advantage of bundle pricing ($46.75), which won’t be available in the new catalog and you would only need to spend $3.75 more to get a Sale-A-Bration freebie. Bundle pricing saves you 10% off the stamps and coordinating dies. Not quite ready to order? That’s okay, just remember that bundle pricing for this set is only available until May 31st!

If you started here, please visit Susan’s blog and show her some blog love. Until next time, remember, creativity and imperfection live together in all we do. “Grace is the face love wears when it meets imperfection.”

~xoxo
Beanie

  1. Christine Szekeres – Artful Musings (you are here)
  2. Susan Schultz – Stampin’ by the SF Bay

Supplies Used
Dragonfly Dreams Bundle
Falling in Love DSP
Soft Sky & So Saffron Inks
Soft Sky Card Stock
Clear Wink of Stella Shimmer Pen
Simply Scored Board
Project Life Corner Rounder

Fun & Crafty | Watercolor My World

Hello my crafty peeps! I’m happy to be here again this month as part of the Fun & Crafty blog hop. This month’s theme focuses on watercolor techniques. The new Occasions catalog is in full swing as well as Sale-A-Bration. I decided to use the new SU watercolor pencils (141709) as well as two Sale-A-Bration items: the “Inside the Lines” DSP (143850) and the brand new 6×6 Glimmer Paper Assortment (143831).

I’ve enjoyed working with watercolor pencils for many years and I was excited to see SU come out with a set that matched their colors. I hope they come out with more! These pencils work much like other pencils I’ve used. They blend smoothly and are creamy when you lay down the color. You can either use aqua painters (103954) or blender pens (102845). Using aqua painters creates a more dreamy look, while using the blender pens showcases the richness of the pigment.


For this card I used aqua painters and three of the pencils, Calypso Coral, Old Olive, and Daffodil Delight. I cut a 2″ x 2″ square from a sheet of the DSP, colored it using the pencils and aqua painters and then cut that into four 1″ x 1″ squares. I mounted the squares to squares of the new glimmer paper (mint macaron). I embossed the sentiment from the “You’ve Got This” stamp set (139575) using VersaMark ink and white embossing powder. Using foam squares I mounted the 4 squares on the front of a Soft Sky card base. You will love how easy these pencils are to use and marvel at the results you can achieve with either water or blender pens.

There is a ton of inspiration throughout this hop. If you started here, please visit the other talented team members listed below and leave them some blog love! Until next time, remember, creativity and imperfection live together in all we do. “Grace is the face love wears when it meets imperfection.”

~xoxo
Beanie

  1. Kathy Thisted – Stampablog
  2. Christine Szekeres – Artful Musings (you are here)
  3. Tobe BThe Craft Sea
  4. Susan Schultz – Stampin’ by the SF Bay
  5. Pamela Wu – Stinky Tofu

Supplies Used:
Watercolor Pencils
Soft Sky Cardstock
Aqua Painters
You’ve Got This Stamps

Sale-A-Bration (SAB)
(1 free item with each $50 purchase)
6×6 Gilmmer Paper
Inside the Lines DSP

Fun & Crafty | “Oooh, Something Shiny!”

Hello my crafty peeps! I’m happy to be here again this month as part of the Fun & Crafty blog hop. This month’s theme: “Oooh, Something Shiny!” is one we can all relate to, particularly at this time of year. I’m sure you are NOT like me … I’m sure your Christmas and New Year’s cards are already done … however, should you find yourself in a last-minute rut, I hope you take some inspiration from the below as well as all the other inspiring projects in this month’s hop.

fun-n-craftybloghop

If you are anything like me you look for stamps and dies that are versatile. When I saw the “Greetings from Santa” stamps and “Detailed Santa” dies, I knew it would be simple to create a number of cards that were different. Far from requiring a lot of thought, these dies and stamps are pretty straightforward in their versatility making them some of my favorite ‘go to’ sets for holiday cards.

For this month’s hop I decided to showcase the simple versatility of these stamps and dies using three different card stocks and three different glitter papers. Each card contains the same elements, but each looks vastly different due to the color combinations. The first combo, ‘Straight Up Christmas’, combines red and white. It is simultaneously colorful and whimsical. The second combo, ‘Frosty Friends’, combines red and dazzling diamond. This is the bling-y version of the card. The third and final combo, ‘Winter’s Magic’, combines silver and blue into an elegant version that evokes a cool winter’s day.

dec16_7  dec16_1  dec16_2  dec16_3

What I especially love about these two products are all the extra images and dies that can be used to add little touches to your envelopes. Here are a couple of examples of what I mean.

dec16_5  dec16_6

Oooh, something shiny wouldn’t be complete without a wee bit of Chibitronics fun. Below is the fun trade I created for a demonstrator event back in September. I used the Cookie Cutter punch and stamp set to create this light up reindeer to guide Santa’s sleigh.

dec16_4  dec16_8

There is a ton of inspiration throughout this hop. If you started here, please visit the other talented team members listed below and leave them some blog love! Until next time, remember, creativity and imperfection live together in all we do. “Grace is the face love wears when it meets imperfection.”

~xoxo
Beanie

  1. Tobe BThe Craft Sea
  2. Christine Szekeres – Artful Musings (you are here)
  3. Pamela Wu – Stinky Tofu
  4. Kathy Thisted – Stampablog
  5. Jennifer Blomquist – Northwest Stamper
  6. Danielle Elvin – Going to Collage

Supplies Used:
Stamps: Greetings from Santa
Dies: Detailed Santa Thinlets
Cardstock: Night of Navy, Cherry Cobbler, & Whisper White
Glitter Paper: Dazzling Diamond, Silver & Red
Ink: Versa Mark
Embossing Powder: White & Red
Other: Fine-Tip GlueEmbossing Buddy

previousblog  nextblog