Category: Gift Ideas

Stampin’ Up’s Online Extravaganza

Hello my crafty peeps! I wanted to pop on quickly to let you know about a sale going on this week! Stampin’ Up! is celebrating Black Friday/Cyber Monday with an Online Extravaganza! Starting November 23rd, there will be three, 48-hour sales each one focusing on two product categories (paper, ink, stamps, etc) and offering a 10% discount off items in those categories. So, shake off that tryptophan coma and visit the Stampin’ Up! site to snap up some great products!

There will be a shortcut in the SU! store each day so you can easily find all the items in that sale. One sale runs at a time:

A few things to keep in mind:

  • Make sure to submit your orders online or with me while each sale is active (click the image above to go to my SU site)
  • Sales are while supplies last and for in stock merchandise only so order early to insure the best selection

Get ready to stock up on some great essentials during the online extravaganza! I am thankful for each of you and wish you a very Happy Thanksgiving! Leave me a comment below letting me know what you’re thankful for this Thanksgiving and you might get a little surprise from me in the mail! Until next time, remember, creativity and imperfection live together in all we do. “Grace is the face love wears when it meets imperfection.”

~xoxo,

Fun with Felt

I’ve long enjoyed the tactile feeling of mixing different mediums in my work and one of my favorites is felt. It is scratchy and soft all at once and comes in a variety of rich and wonderful colors.

Die cutting felt is pretty simple provided you have the right material. I find that the best cuts come from felt that has at least some portion of wool. I try to stay away from polyester and other “fake” felts, opting instead to spend a bit more for felt that is at least some portion wool. I purchase my felt locally. You can also get it online.

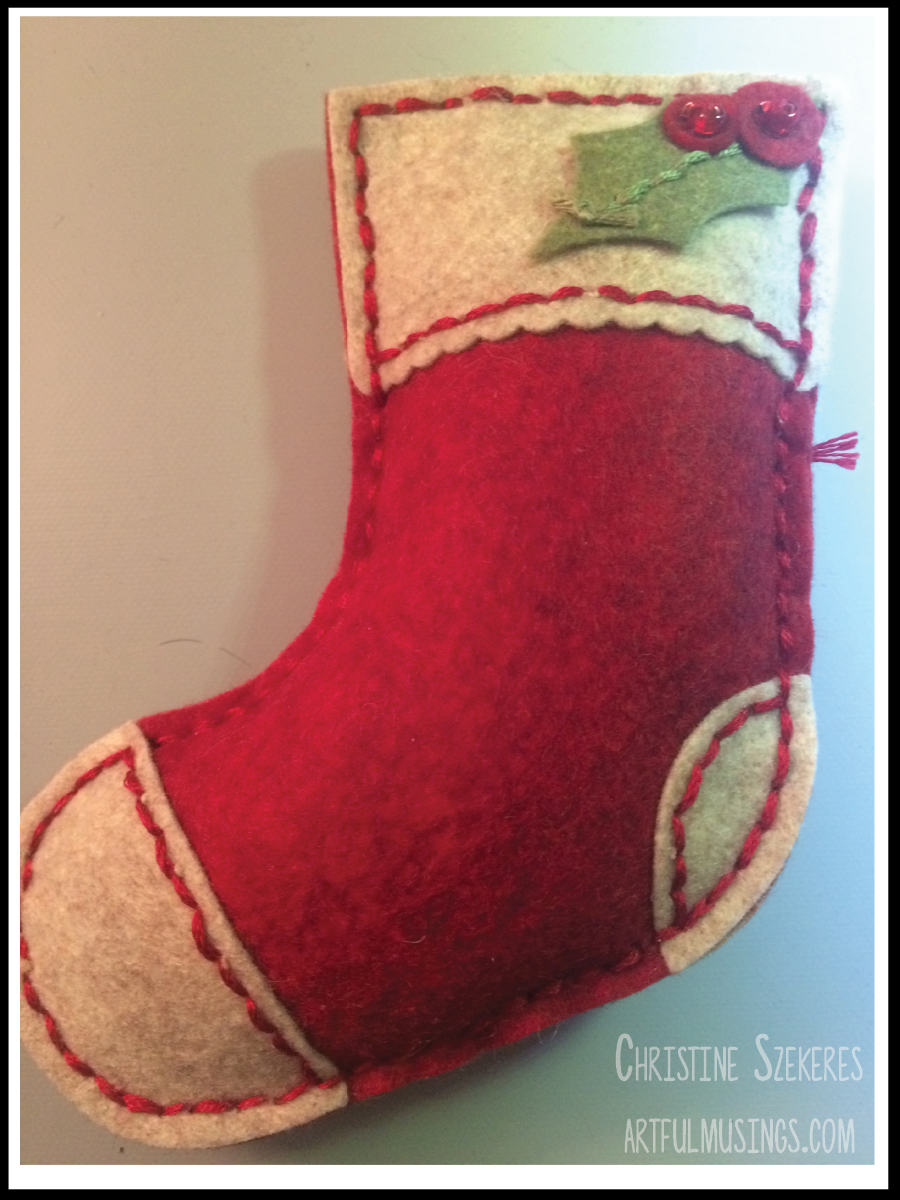
Back in the fall, Memory Box came out with a line of dies specifically designed to cut felt and be sewn together. I was intrigued. I bought the stocking and the large snowman and then they sat, untouched, in my die storage. Sigh…

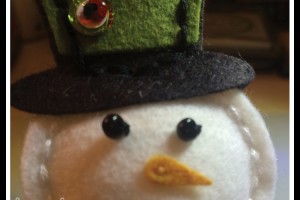
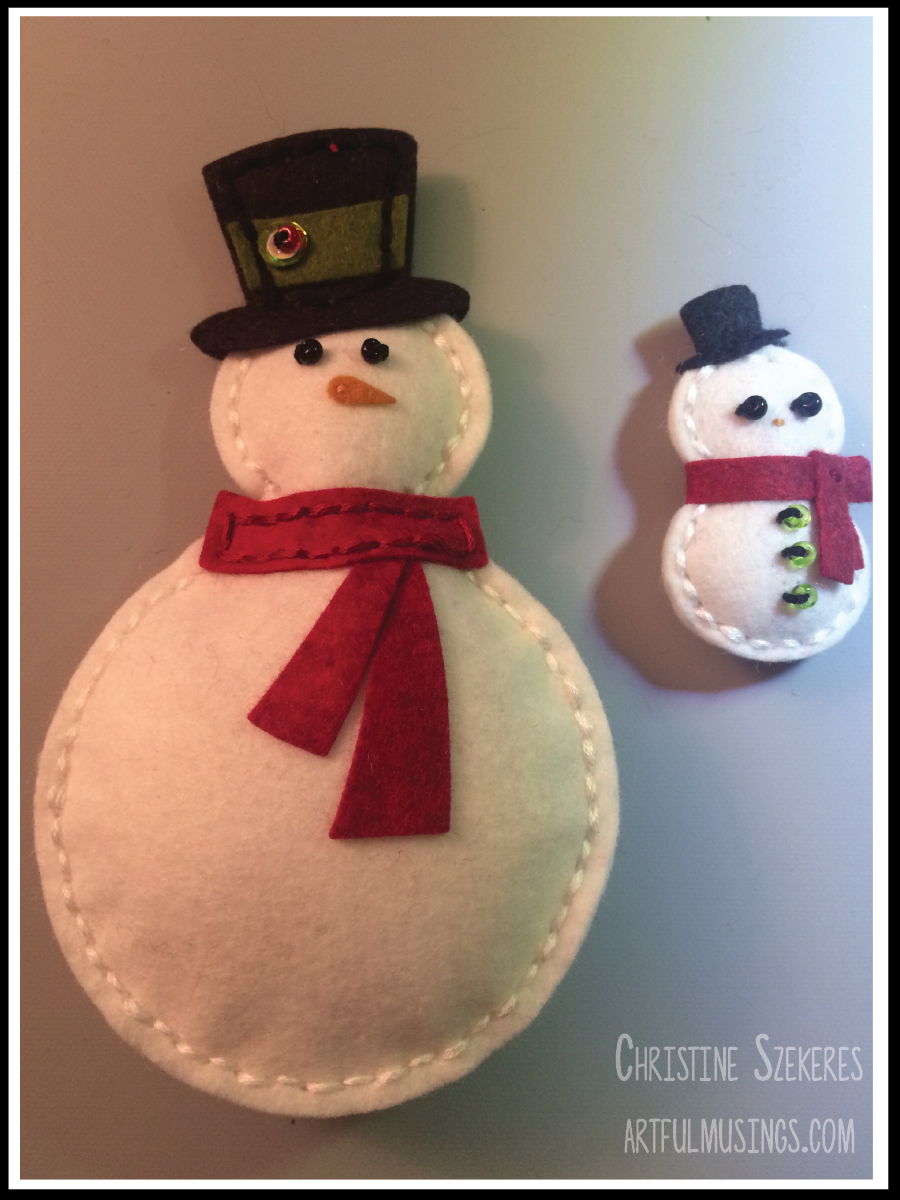
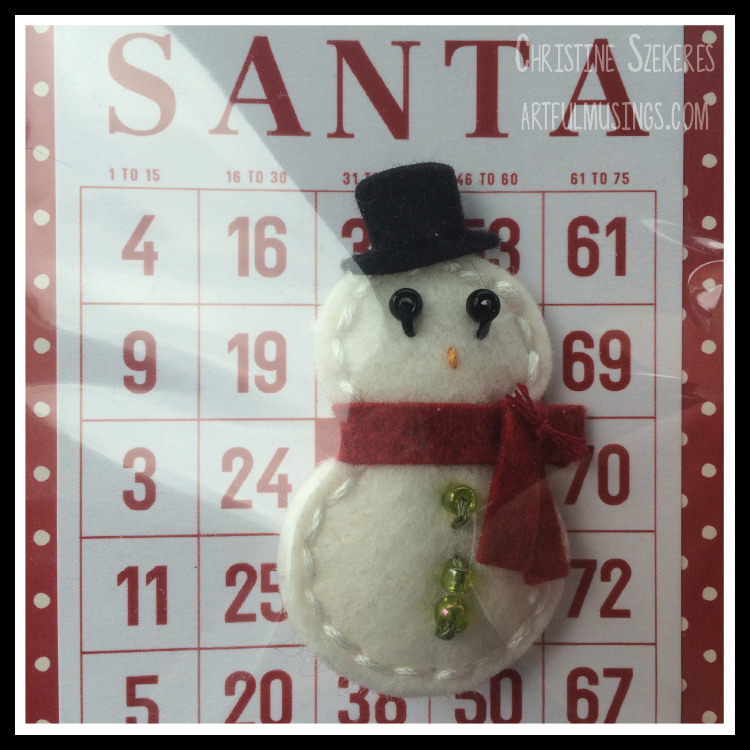
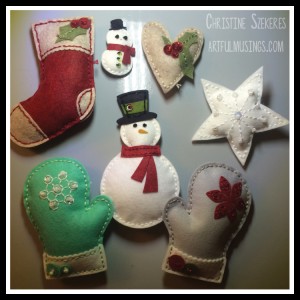
Early in December I had the opportunity to take a class working with these dies – I promised myself if I didn’t enjoy it I was going to return the dies no matter how cute they were. Class was designed to allow the completion one, possibly two, of the 6 options, which included a stocking, a large snowman, a tiny snowman (named Sheldon), a heart, a star, and a mitten. I ended up completing the heart, the large snowman, and getting a good start on the stocking. Needless to say, I was hooked … and thus began my plush obsession.

Snowmen1 Stocking1

I ended up making stocking ornaments (like the above right) for the intern team at SAMBICA and after making 10, I became somewhat of an expert and found it very relaxing, particularly while watching TV or listening to music. TIP: I like to use dental floss threaders to assist me in getting the needle threaded and for beads that have smaller holes.

Memory Box has expanded the plush line to include some additional spring offerings including: a pocket egg, a folk heart, a heart border, a songbird, a small bunny, and Liam Bunny. There are also several add-on’s that can be added to the above including: flower buttons, small & large poinsettias, small & large snowflakes, holly & berries, and a baby heart. They are so much fun that I have planned another post once I’ve had a chance to finish all the hearts, eggs, and bunnies!

Here is a picture of the winter ornaments I made. I gave the little Sheldon snowman as a gift to several friends. I turned him into a pin by adding a pin back before I sewed him together. He is so precious!

WinterFelt Sheldon1

Until next time, remember, creativity and imperfection live together in all we do. “Grace is the face love wears when it meets imperfection.”

~xoxo
Beanie

Supplies Used
Wool Felt & Poly-Fil
Memory Box Plush Dies
Glass Seed Beads 6/0 (various colors)
DMC Embroidery Floss (various colors)
Tapestry Needle & Floss Threader

Tag … You’re It!

Hello friends! I can hardly believe that we are T-minus seven days from Christmas Eve. 2015 has truly flown by at warp speed. As I prepare for Christmas: baking cookies, buying that perfect little something for a friend or coworker, I am always thinking of presentation as well. The wrapping of Christmas presents … or any present for that matter is almost as important as what is inside. The right packaging can pull a gift together and let the recipient know how much you care and really reflects the work put into handmade gifts in particular.

TagYouRIt1

What I especially like is the size of this project, I can pre-cut tags and other elements and then sit in front of the TV watching a Christmas movie (Scrooged, White Christmas, Holiday Inn, or Elf). They go together quickly and I make more than I need for those gifts that seem to pop up at the last minute.

With this in mind, I decided to pull out my Christmas papers, Yuletide by 7 Dots Studio and Vintage Christmas by Blue Fern Studios and make some gift tags for the handmade goodies I’m giving friends this year. Any die set will work to make your tags, you can even purchase pre-formed tags in white, kraft, black, and other colors. For these tags I used the Holiday Tags Stamps & Die Set from My Creative Time it is my favorite at the moment. I think they are so festive. I also added sequins, pearls, trees and holly cut from glitter paper, and a bit of festive washi tape. Here are a few pictures to get your creative ideas flowing.

TagYouRIt2  TagYouRIt4  TagYouRIt6  TagYouRIt5

I hope this has inspired you to take a look at your gift wrapping and make some festive gift tags. Until then, remember, creativity and imperfection live together in all we do. “Grace is the face love wears when it meets imperfection.”

~xoxo
Beanie

Supplies Used
YuletideVintage Christmas
Holiday Tags Stamps & Die Set
Pretty Pink Posh sequins
Red Pearls
Heidi Swapp Glitter Paper
Fresh Ink: Currant & Mojito
Christmas Cross Stitch Washi
Christmas Tree Winter Washi

Yuletide Greetings

Happy Monday before Thanksgiving friends! If you find yourself here, welcome! Grab a cup of tea (or coffee) and enjoy a few minutes with me while you take a break from your Thanksgiving preparations.

Today I have a group of Christmas cards made using the Yuletide collection from 7 Dots Studio. I love these papers and have enjoyed playing with all the bits that came in the collection. In addition to the 12 x 12 papers there are tags, word stickers, element stickers, and a second sheet of element goodies. More than enough to spark your creativity!

YuletideGreetings5

For the first card, “Holly Jolly Christmas” I used one of the large tags, a word sticker, a chili pepper card base, and a wooden tree from UmWow Studio. First, I ran the front of my card through the Big Shot inside a texture plate (knit sweater) and I rubbed metallic gold ink over the texture to give it definition. Next, I die cut the Seattle skyline out of the Gingerbread card stock. I adhered the tag to a piece of Warm Cider card stock (the snowflake side) and trimmed it close. I popped up the skyline using black foam dots and added the Holly Jolly Christmas word sticker to the tag. I painted the tree using a dark green glitter pen and glued a silver star sequin to the top. Once it was dry, I glued it to the skyline. A red enamel disc and bit of creme an gold ribbon and this card is complete.

YuletideGreetings3

The next card, “Noel”, uses one of my favorite dies, the word noel with reindeer antlers, which I cut out of a piece of Sugarplum card stock. I mounted on another of the large tags and tied some red and green twine through the hole in the tag. I also cut a 5.5″ x 1″ strip of Gingerbread card stock and mounted it to the vanilla bean card base. Next I popped up the tag using black foam dots. To finish off this card I glued down a few snowflake sequins and added Rudolph’s red nose.

YuletideGreetings4

The “Joy” card is mounted on a juniper card base I ran through the Big Shot with a texture plate (numbers). As before, I rubbed gold metallic ink over the face of the card to highlight the texture. I die cut the bough out of vanilla bean card stock and used some Queen & Company red pearls for the holly berries. The focal piece, the joy chipboard ornament, was painted with red paint and then clear glitter pen was added over the top to give it a bit of sparkle.

YuletideGreetings2

The final card, “Presents Squared”, uses a crimson card base run through the Big Shot with a texture plate (brick wall) and highlighted using gold metallic ink. I cut a strip of Sugarplum card stock 5.5″ x 2.25″ and mounted it to the front of the card. I chose another large tag and a few square sticker elements that I applied to the tag. Another UmWow Studio chipboard (a present) was colored using a gold orange glitter pen and adhered to the tag. A green enamel disc adds a pop of color to this card.

YuletideGreetings1

I hope you have a blessed and joyful Thanksgiving. We will be back with another Christmas preview week beginning Sunday, December 6th! Until then, remember, creativity and imperfection live together in all we do. “Grace is the face love wears when it meets imperfection.”

~xoxo
Beanie

Supplies Used
Yuletide collection
UmWow Studio
Queen & Co Red Pearls
Joy Chipboard Ornament
Big Shot & Dies, Adhesive, & Gold Metallic Ink

Yuletide 6×6 Trio

Hello and welcome to another Christmas-themed project. I am so happy to have the opportunity to share my Christmas creativity with you this week. It’s a dream come true, being on a design team, and it is my hope that the projects created inspire you on your own creative journey.

Earlier this week I posted a project using the new Blue Fern Studios Vintage Christmas line, which I love but for today’s inspiration I pulled out the Yuletide collection from 7 Dots Studio. I love the papers from 7DS because they are so different from what American manufacturers are creating.

Using some new (and a few old) Christmas dies and the lush and beautiful Yuletide papers I created three 6″ x 6″ panels.

YuletideTrio4r

The first panel was made using Sugarplum for the background, which contains a picture of a stag wearing a crown. I trimmed the paper to 5.75″ x 5.75″ and adhered it to the background. Next I cut the Noel die using a contrasting paper, Gingerbread.

YuletideTrio1

To create interest among the three panels I reversed the color palette on the middle panel, focusing on red for the background. Using Gingerbread again, I cut the reindeer roster and the leaping reindeer out of the remnants of the Sugarplum piece. To add interest I popped the reindeer up using black foam dots.

YuletideTrio2

For the final panel I used the snowflake side of Warm Cider and cut Santa’s sleigh and eight reindeer out of the remnants of Gingerbread and the skyline and moon out of Sugarplum. I mounted Santa using black foam dots and then stamped the phrase “all is calm and bright” in blue ink.

YuletideTrio3

I hope you have enjoyed today’s Christmas preview. Until then, remember, creativity and imperfection live together in all we do. “Grace is the face love wears when it meets imperfection.”

~xoxo
Beanie

Supplies Used
Yuletide Collection
Sizzix Reindeer Names Die
Ken Oliver Art Blocks
“And Bright” Stamp
& Adhesive

Giving the Gift of Fashion: Custom Barrettes

Hello, friends! Beanie here again sharing another gift idea for all the ladies in your life: hair barrettes. Sounds simple, right? Well, it truly is but it makes a wonderful gift. Customizable for any style, color, or occasion, these fashion accessories make wonderful gifts.

Requiring minimal supplies, these barrettes come together so quickly and easily you will be astounded at how many you can create in an evening.

Fashionable1

For the ones shown here, I used Lindy’s Stamp Gang Autumn Leaves Sidekick and Prima’s Pearl White Color Bloom sprays to give a shimmer to the flowers. TIP: Did you know that you can refill Color Bloom sprays with filtered or bottled water two times? That’s right, when the bottle is nearly empty, simply refill it with filtered or bottled water, shake it up, and you’re ready to go again. The Color Blooms may seem expensive, but when you factor in three bottles out of one, they are actually one of the more inexpensive sprays on the market.

I made card backs (a piece of 3″ x 3″ cardstock) to hold the finished barrettes using 7 Dots Studio’s Cold Country paper line (choose paper that compliments the barrettes). You can find your barrette base online at Amazon (I used the 2″ type for these), at your local beauty supply, or Target. I used many different types of flowers and centers (micro beads and other self-adhesive gems). Fabri-Tac is my favorite adhesive for this sort of creation because it sets up so quickly.

Attach the base flowers to the barrette using Fabri-Tac (it dries quickly so you won’t have to wait long to move forward). Before attaching your focal flower, add anything to the center (beads, sequins, gems, etc) using Fabri-Tac or other dries clear adhesive and let that set up. Once it’s set, you can attach it to the barrette using Fabri-Tac.

Fashionable2 Fashionable4

The most difficult part of this project: choosing flowers. There are literally thousands of combinations and the sky is the limit for customization including beads, self-adhesive gems, sequins, sprays, die cuts, mini bells, and on and on! Be sure to stop by the store for all of your paper crafting needs. Some wonderful new goodies are being added for the holidays!

I hope this idea inspires you to step outside the box in terms of gift-giving. Remember, creativity and imperfection live together in all we do. “Grace is the face love wears when it meets imperfection.”

~xoxo
Beanie

Supplies Used
7 Dots Studio Cold Country
LSG: Autumn Leaves Sidekick
Prima Pearl White Color Bloom
Flowers & Barrettes
Self-Adhesive Gems, Buttons, & Brads